Take Tamiya's Sogo Keibi or Starcard 911 Gt2 kit and one Scale Productions
1998 GT-2 Transkit DMC Playstation Gt-2 decal set and the end result could
be this. The Sony Playstation/Fat Turbo GT2 Le Man's racer.
Tamiya's 911 GT-2 has been built to death, so there is very little I can add
here that is productive. Instead I will concentrate on how Scale Productions
transkit interfaces with the base kit and the few modifications made. Scale
Productions 1998 GT-2 transkit consists of a replacement resin cast nose and
white metal rear spoiler.
 

Installing the new nose is probably the hardest part of the project. The nose
is to be installed in place of the existing nose along the "panel lines" of the
base kit. Simply remove, with a razor saw, the entire styrene nose. I first made
horizontal cuts along the sides as these are straight and truly horizontal.

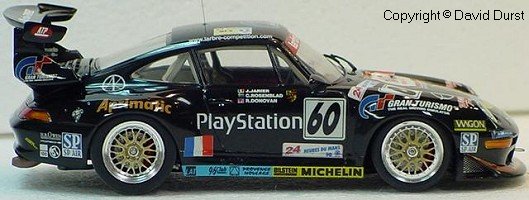
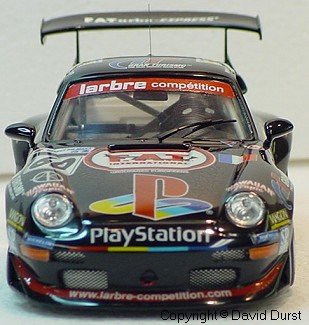
A couple of quick cuts and the bulk of the nose is removed.
The second cut isalong the hood line and this cut must be made horizontally also.
If the cut is made vertically you will have to do a lot of sanding and shaping to get the nose to fitcorrectly. The final cuts are the rounded areas around the headlights.

These were a little more difficult requiring quite a bit of fitting time as the final
shape mustbe made to match the resin nose. The resin nose has a lip that fits under the
styrene and is intended to be flush with the surface of the styrene when installed. If the
styrene is cut and shaped correctly little or no filler is required to get a near
perfect panel line again.

Most of the cleanup on the resin is in the locations of the
air openings. The resin is a little thick and could benefit by sanding to reduce the
thickness. I installed photo etch screen in all of the openings of mine not because I
had an accurate reference to do so but because I liked the silver contrast with the
black paint. I guess a purist may have painted the screen black but I generally do what
I like best on some of the smaller details.


The white metal wing is not exceptional by any means. There is a moderate amount of
cleanup required and the details are "soft". I filed off the mold lines and placed
in a tumbler with corn cob medium overnight to smooth the rough texture. The part was
painted and decals were applied prior to being installed.

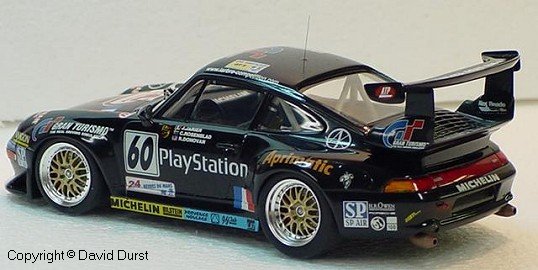
The installation was fairly straight forward. You will find a couple
of vertical extensions for the wing that the kitpart mounts between.
I installed the extensions as required after filling the mounting
holes for the kit supplied wing. The extensions were then cut and sanded to the lower
profile of the replacement metal wing. The wing was left off until very last as there
is next to no contact surface to adhere to. When completed the wing was installed with
a small amount of CA.


The interior was painted according to what little information I could find. Roll cage
padding was added as well as a little detail to the dash. Really not much to change as
I could not find any information other than an exterior picture allowing me to see the
interior colors.


The decals came with a photo of the car taken from a magazine. There is only one view
and it does not contain enough information to place the decals correctly. I managed to
find a few pictures on the web but they are difficult to find mostly due to the fact that
I had to wade through 2 million pages about Playstation and Gran Turismo 1, 2 and 3.
The decals are incomplete but given the relative obscurity of the subject I decided not
to make the remainder of the decals. The decals do react with automotive lacquer clear
coat. (PPG Duracryl Clear Gloss) It was pretty ugly to say the least. Once the first coat
was applied there was no choice but to continue. A light sanding to smooth between each coat of clear and lots of polishing took care of most of the problems.


With the exception of the decals reacting to the lacquer the build was enjoyable
and straight forward. I have around 30 hours in the model and look forward to building
another Tamiya 911 GT-2 kit hopefully with the Repsol refinery graphics and transkit if
I can find one.

All photos and text David Durst


page created by Bill Via 11.04.00
E-mail:gpma@home.com
Archive Index