 |
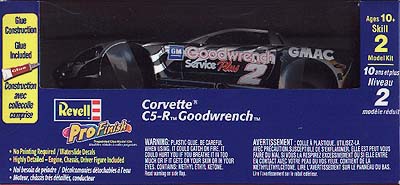
Revell ProFinish
Corvette C5-R
Goodwrench
Kit Review
by Mike Stucker
|
 |
In 1998, Chevrolet announced the formation of a team to campaign a racing version of the new Corvette C5, known as the C5-R.
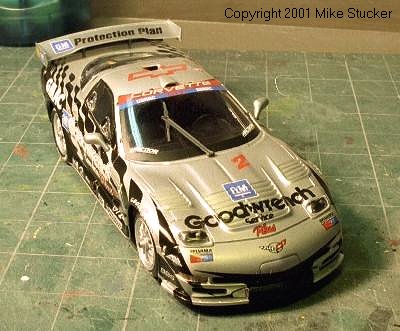
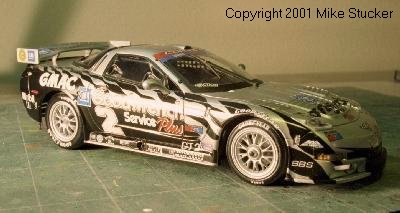
Painted in the black and silver of GM's Goodwrench Service Plus auto maintenance division, these racing beauties debuted at the USRRC's 1999 Rolex 24 Hours of Daytona.
|
 |
Although they lost their class to the Dodge Vipers, the race team was off and running. They also ran the 12 Hours of Sebring and other selected American Le Mans Series (ALMS) events in 1999.
The racers returned in 2000, now painted yellow, black, and white. They raced again at Daytona, most of the ALMS races and also the 24 Hours of Le Mans.
|
 |
Success eluded the team until Labor Day weekend, when Ron Fellows and Andy Pilgrim drove their C5-R to a GTS class victory in the ALMS race at Texas Motor Speedway. They repeated with another class win in the Petit Le Mans race at Road Atlanta.
|
 |
Now wearing a solid yellow paint scheme, 2001 has started very well as the team scored an overall win in this year's Rolex 24.
The Model
The C5 is possibly the best looking 'Vette ever produced, and the racing version is even better looking. Those looks combined with the Corvette mystique means that any model of this racer would be snapped up by race car modelers.
|
 |
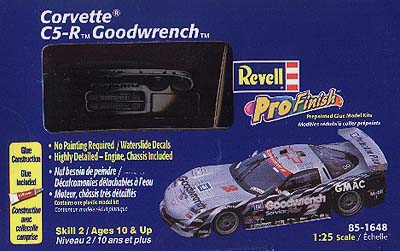
Revell has produced the 1999 #2 Daytona car as a Pro Finish (pre-painted body) kit in 1/25th scale. They will soon follow this up with a model of the 2000 Le Mans car as a standard unpainted kit. The Le Mans kit will have the identical plastic parts -- no new or modified tooling was made for it.
|
A note on scale: Several modelers have shown distress at it being produced in 1/25 instead of 1/24. Most foreign race cars are in 1/24. So it was hoped that the C5-R would be made in 1/24 to look "correct" sitting next to other race car models.
Revell chose 1/25 to match all of their other Corvette models, which is the preferred scale of many street car modelers. But Revell admits that the model scales-out slightly larger than 1/25.
Packaging
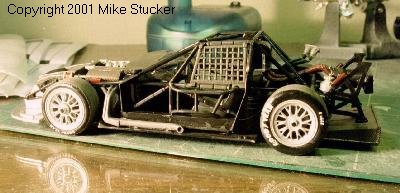
As with all Pro Finish kits, the C5-R is packaged with the body showing through a clear plastic window in the box. Inside the box are three compartments: one for the body (which is held in place by two plastic straps); one next to the first holding a tube of Ambroid plastic cement, tires (in their own bag), window glass and taillights (in another bag), and the two side pieces of the rollcage/frame. Underneath these is the third compartment holding the instructions, decals, and the remainder of the parts (in a plastic bag). Inside this big bag of parts are a couple of smaller bags. One contains the metal rear axle and another a sprue of pre-painted parts.
The Body
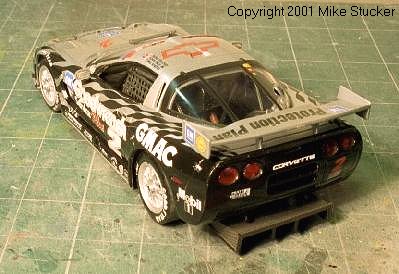
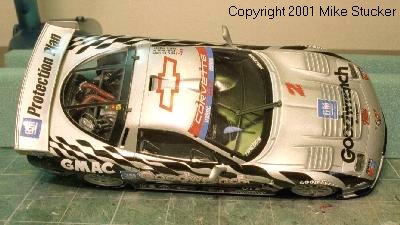
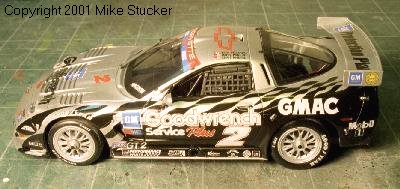
OK, the body comes pre-painted. What's it like? Very nice, actually. What is painted on it are the black and silver paint scheme which looks like a wavy checkered flag on the sides of the car. Also, the words "GM Goodwrench Service Plus" and the number "2", are tampo printed on both sides of the body. All other markings are to be applied by the modeler using regular water slide decals.
The "wavy flag" paint scheme might be hard to paint or apply by decal, so having it pre-painted isn't that bad a deal. However, if I were going to choose to pre-paint any of the sponsor logos, I would have chosen the "Goodwrench" on the hood, not the logos on the body sides. (More on that hood "Goodwrench" later.)
The paint was applied almost flawlessly. There were a couple of barely noticeable scratches in the paint, and the white background of the "Goodwrench" logo appeared to be too large behind a couple of letters, but otherwise I am quite impressed.
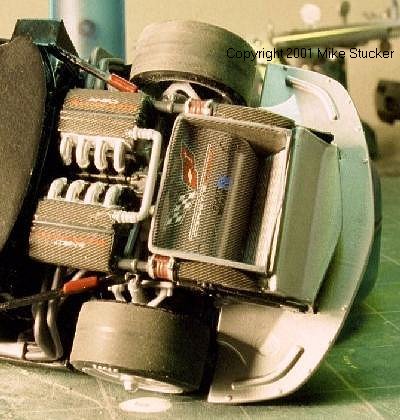
As far as body shape, it looks dead-on to me. It comes with the hood molded shut, which is odd because the kit comes with a detailed engine. This may be because of the decision to release it as a Pro Finish kit. I'll discuss opening the hood later.
One worry about pre-painted bodies is that any mold lines won't have been removed. That's true of this body, but the only two mold lines present are almost invisible. They are on the front fenders, just behind the fender louvers. They almost look as if they belong. They are all that mar an otherwise wonderful body.
Other Parts
In addition to the body, the rear wing, side mirrors, and transaxle are also pre-painted silver. The remainder of the solid color plastic parts are molded either in black or metallic gray. There is a mold line running down the center of many of the unpainted parts. These, of course, need to be sanded off before painting and assembling. The styrene used for this kit is soft, though. This makes the parts rather flexible and less likely to break in half if bent, but it can be gummy when filing and sanding.
One very nice touch is that the black edges on the window glass is pre-painted on. This can be difficult to mask and paint, so this is one feature that will be appreciated by many modelers.
The tires have the Goodyear logos pre-printed on them. They are, however, very glossy and seem to have a chemical (mold release?) on them that will quickly dry out the skin on your fingers when you handle them. I would clean them in a mild soap right away. After they are dry, scuff the tread surfaces with sandpaper and paint the sidewalls with flat clear paint -- I used Gunze Sangyo Aqueous acrylic.
Accuracy
This kit is NOT the car that Ron Fellows, Chris Kniefel, and John Paul Jr. drove at Daytona. The decals are correct for that car, but not the rear window and fuel filler. The fuel filler comes up from behind the driver's compartment to a hole cut in the rear window. The hole and the filler are on the right side of the model. But at Daytona, it was on the left side.
How could Revell have messed this up? I have a theory. The fuel filler placement can be altered from race to race depending on track direction and pit placement. You always want the filler to be on the side closest to the pit wall, so the fuel hose doesn't have to reach as far. Most road courses run clockwise and have the pits on the inside of the track. This would put the filler on the right side, which is closest to the pit wall. At Daytona they run counter-clockwise with the pits on the inside. This results in the filler being mounted on the left side of the car. Revell must have taken their dimensions off the car much later in the year, long after the race at Daytona, and also after it had been reconfigured for another race!
Also, a few items are missing from the kit that perhaps should be there: front and rear tow hooks, a roof mounted TV camera pod, and a roof mounted radio antenna. There may be some aftermarket tow hooks available and the pod and antenna can be scratchbuilt. My intention with the kit was to build it box stock, so I didn't worry about these "missing" parts.
There is no driver's side window glass in the kit, but the photo on the box shows a window in place. Again, its possible that the car Revell measured did not have this window. They didn't use the window at Daytona this year and my own photos from Texas Motor Speedway in 2000 seem to show a partial window.
Painting
Painting? What do you mean, "painting"? I thought it was already painted? Well, yes, the body is painted, but it could use some detailing. Also, the remainder of the parts will look much better if we paint them.
On the body, paint the edges of the side window openings, including the small triangles just above the mirrors, gloss black. The rear side marker lights need to be painted clear red over silver. Front turn signals need to be painted clear yellow over silver. Note that what appears to be one large light at each front corner is really two. It is yellow to the side and white (silver) to the front.
The upper grills (between the corner lights and the center of the nose) should be painted flat black. All the small, rectangular, body clamps need to be painted flat aluminum. Finally, the thin edge at the bottom of the body, between the wheel wells, should be painted silver. (I used silver pin stripe decals from Herald King along these edges.)
The small pins used to locate the side mirrors too the body should be painted gloss black as the edge shows in a black painted area of the body after they are glued in place.
The supports for the rear wings are silver on the upper half and black on the lower half. (Something I didn't find out until after I had finished the kit, so I don't think I can correct it.)
Unfortunately, the "glass" for the mirrors is unpainted metallic gray plastic. Chromed would have been nice, so as to have a mirror-like finish, but with no need for any other chrome parts, it wasn't going to happen. You'll have to paint them as best you can or use Bare Metal Foil.
I painted the wheels with Tamiya spray paint TS-17 Gloss Aluminum, my favorite aluminum for wheels. The face of the wheel centers should be black.
Although pre-painted silver, the ribbed portion of the lower grill should be painted black.
|
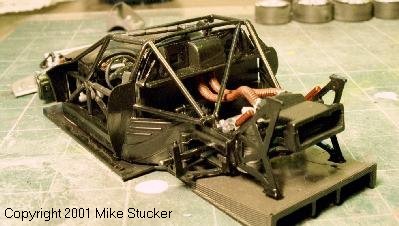 |
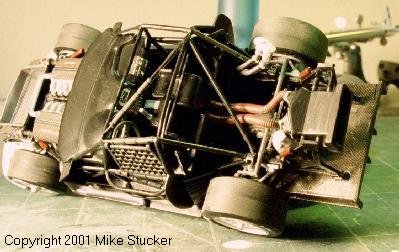
The instructions indicate many of the parts that should be painted and what colors to paint them. If no color was indicated, I painted the black parts semi-gloss or flat black and the gray parts silver. I sprayed the chassis, roll cage, and interior panels semi-gloss black and they look great. The roll cage padding was painted flat black.
|
 |
There are small "tubes" on the front of each rollcage side that the instructions state should be painted red. This is correct. What the instructions don't tell you is that there are two more of these tubes on the rear of the cage that must also be painted red.
The instructions tell you to paint the outer front edge of the splitter (the front portion of the belly pan) silver. To make masking easier, I painted the entire front section back to the wheel wells, top and bottom, silver. The excess won't be seen on top after the body is attached and won't be seen below unless picked up.
|
 |
Also, the black markings on the front of the body should be carried onto the splitter. For the parts such as the splitter and rear wing supports, I used Tamiya spray #30 Silver Leaf, but something more metallic would be better.
I painted the seatbelts, which are molded to the seat, blue and then sprayed the seat (yes, bare black plastic) with Testors Dullcoat. Looks great!
|
Assembly
Just follow along with the instructions, and you won't have any problems, at least not major ones. The first thing you do is build the engine. If you want, you could leave the engine out of the model and save it for something else. It is absolutely unviewable when the model is completed. Which is a shame, because once you've got it built and the intake boxes installed, its pretty cool looking. The kit supplies carbon fiber decals to cover the intake boxes. They go on very easily if you use a good decal solvent, but aren't quite cut properly. There were still small gaps of plastic showing after the decals were applied.
Be careful when installing the engine and, later, the exhaust headers. I twisted one or the other out of position and this caused problems installing the left side exhaust pipe.
The large carbon fiber decal that goes over the top of the diffuser at the back of the chassis was also not cut quite right. The two locating holes that fit over a pair of pins were not centered on the decal, so it was slightly longer on one side than needed and a tad short on the other. I also managed to mangle a corner of the decal so that I have a bit of exposed plastic. Scale Motorsport 1/24 scale carbon fiber decals have too fine a mesh to match the kit supplied ones, so are not of much use as a patching material. Maybe their 1/20 scale ones can be used instead.
Speaking of the decals, be very aware of where any white colored decals are before you start cutting decals off the sheet. The backing paper is white, making it hard to see the white decals. I almost cut white decals in half twice.
Chassis assembly is pretty straight forward. I did have to use plastic clamps a few times to hold pieces together until the glue dried. Such times were when the cage sides were glued to front crossmember, when the rear ductwork was glued in between the cage sides, and to hold the dash to the chassis. In the end, everything looks fine. By the way, I chose not to use the kit supplied tube glue. Instead I used Testors liquid and Faller Super Expert glue (plastic bottle with metal tube applicator) for better application control.
When you get to painting and installing the seat, note that one of the molded in seatbelt buckles appears to be folded under the seatbelt. At least that how I painted it. That's my story, and I'm sticking to it.
The hoses on the rear ductwork are only semi circular -- they are open on the bottom. This ends up not being a problem because you can't see underneath them on the completed kit.
There is a large single decal to cover most of the dash. It has carbon fiber, gauges, and switches printed on it. The dash has gauges and switches molded on it. I was real worried that it would look like hell if I used it, but tried it out anyway. Guess what? It works! Get it centered and hit it with a good dose of strong decal solvent. That baby sucks right down onto the dash with all the proper colors being on all the corresponding bumps.
There is a second decal for the dash that is a black square with the Chevy bow tie logo on it. The instructions say to paint the dash all black but the logo on that decal is black on transparent. The small panel it goes on must be painted a lighter color, but I don't know what. I couldn't find any reference photos of the dash, so I chose to paint that panel silver, as it would match the rest of the car that way.
|
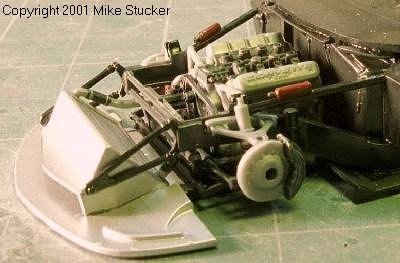 |
In Step 5A, make sure you glue the two radiator hoses in place before the upper crossmember. Also in this step, note that the upper A-arms are curved on the top and flat on the bottom. Orientation is not well indicated.
|
 |
Also at this time, be careful when cutting the shock absorbers from their tree. Cut close to sprue, not close to the shock absorber or you'll cut off the lower locating pin. The four shocks are identical, but the rear ones really need to be longer -- they don't reach to the top of their chassis mounting point.
|
 |
The fuel filler is supposed to be installed in Step 5C, but I would wait until just before attaching the body to the chassis. The reason is that the top of the fuel filler needs to line up with the oval cutout in the rear window. Mine does not.
|
Either the fuel filler or chassis mounting location is in error, I positioned it incorrectly, or it sagged out of position as the glue dried. I also think it should be longer, so that it almost touches the rear window. Leaving it until last will allow you a chance to adjust it or brace it in position before the glue dries.
When you install the front wheels and tires to the chassis, carefully test fit the locating pins into each of their wheels, brake rotors, and chassis uprights. One of mine was very tight and wouldn't go in all the way, so I had to file and re-test fit until it would go without too much force.
Note that in Step 7, the headlight covers have their part numbers reversed on the instruction sheet.
When you glue the windshield wiper in place, it should be almost vertical on the windshield, not down against the hood.
The taillights have texture and a ring around the edge of one side. There is no indication which side is glued to the body and which faces out. I've seen lots of lights that have the texture on the inside, so I glued them in place smooth side out. This also allows you to apply glue to only the ring around the edge, which will result in no glue blob showing through the lens.
You must carefully cut the wing from its sprue as the rear edge is where it attaches to the sprue. Carefully sand that area flush afterwards. You may need to apply a little touch-up paint.
When attaching the body to the chassis, slide the chassis into the rear of the body and pivot it down. The only place I glued it was along the front edge of the nose. It does spring up in the back a little so I need to find additional contact points to apply glue to.
I glued the mirrors onto the body as the very last step, after all the decals were in place. I wanted to make sure I wouldn't knock them off or damage them.
Decals
The decals supplied with the kit are excellent. They are not quite as thick or as stiff as the decals that are supplied in the Revell CART Champcar kits, but they take decal setting solution very well. I used Solvaset whenever needed. There are a few of thing to do to make everything go smoothly and give you a great finish to the car.
First, the "Mobil 1" decals for the rear quarter panels cannot be placed as on the instructions placement guide. The lettering will not fit vertically between the rear marker light and the nearby body clip. Place the decal just below the light and almost against the clip.
The large red Chevy bowtie logo must cross a deep NACA duct on the roof. It will be partially suspended in the air if you don't cut it at the edge of the NACA duct. I applied it, let it dry, then cut it with a sharp Xacto blade. After cutting, I applied Solvaset. The modeler should probably hand paint the short missing pieces of the logo that are caused by the cutting, but I didn't.
The toughest thing you will encounter while building this kit is placing the large "GM Goodwrench" decal on the hood as it crosses the deep louvers there. It takes a while to get right but is not really hard to do. Position the decal so that the "GM" logo and the left point of the "w" in "Goodwrench" are centered on the hood's central ridge. Bottom of the word "Goodwrench" goes over the second louver from the front of the car. (Note that the decal is not quite as wide as shown in the instruction's placement diagram.) After the decal has dried (it will be flat with much of it hanging in space of the openings between the louvers), cut the decal along the louver and central ridge edges with a new, sharp #11 Xacto blade. The section now cut can be folded down onto the louvers. Decal setting solution will help soften them and hold them down. The "Service" decal on the first louver must also be treated in the same manner.
Advanced Modeling - Opening the Hood
I would advise against cutting the engine cover (more appropriate than hood) open on this kit as it will most likely damage the paint job. It might be worth a try on the future release of the unpainted 2000 Le Mans version.
Note that there are lines on top of the front bodywork that seem to indicate it opened like the on the street car. It does not. These are decorative only, to make the racer look a little bit more like the street car.
To separate the engine cover from the nose and central bodywork you will need to cut along the following two lines that start on the side of the body, cross the top, and finish on the opposite side. The line in front of the windshield starts horizontally at the rear center of the front wheel well, then turns up at the door, runs along the curved rear edge of the fake hood beginning at the A-pillar, turns down at the other A-pillar, and runs horizontally into the front wheel well. To separate the nose from the engine cover, cut along the line that runs from the front of one front wheel well, around the back of the first headlight bucket, across the front of the bodywork below the louvers, around the back of the second headlight bucket, and then down the side into the other front wheel well.
To get an engine cover that fits properly might take two kits. One kit will supply the body and nose while the other supplies the engine cover. This allows you to not worry about the thickness of the cut. You remove the material from the inside of the line on one body and from the outside on the other. It may well be worth the effort as the engine will probably look terrific with a little detailing.
Other Versions
As mentioned earlier, Revell will be releasing an unpainted kit of the 2000 Le Mans racer. Hopefully, we'll get a few sets of alternate decals from the aftermarket. The paint scheme was altered twice in 2000 after Le Mans, so that's two possible sets there. I'd personally like a set for the 2001 cars. Even a set for the black and silver 1999 cars would be nice for those whose want to paint their own. The sets could include decals for both USRRC and ALMS racers.
Conclusion
Despite the minor flaws, this is a great kit. I had a lot of fun building it. It is certainly not a kit for a beginner and should not be your first glue kit, mainly because of the extra bit of work needed to apply some of the decals. But its perfect for the semi-experienced modeler who has never spray painted a body or isn't very good at. But if you are a fan of sportscars or Corvettes, don't stay away from this kit because it's a pre-paint. It's the only game in town right now for this car and its pretty well engineered.
|
 |
These Corvette kits should be another hit with the racing crowd, just like the CART Champcars. Props to Revell. Now, how about some more road racers. They could start with the GTS Viper, and then a Cadillac LMP, and then ...
Last Modified: April 22, 2001
Return to: Archive Index
|
|
|