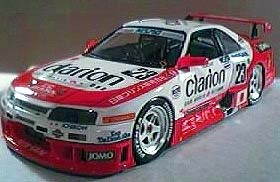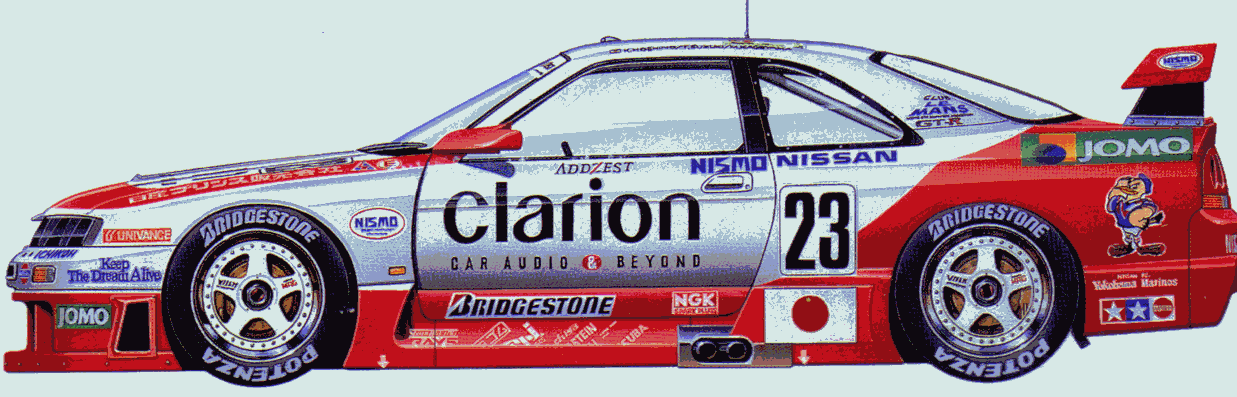
After all the "fun" with the Airfix Peugeot 905 kit it was with great relief that I returned to Tamiya with their Nissan Skyline GT-RLM 1995 Le Mans contender. This is one of four Skyline GTR kits available, the other three being from the Japanese GT series of 1995/96, the CALSONIC, KURE and UNESIA sponsored machines.
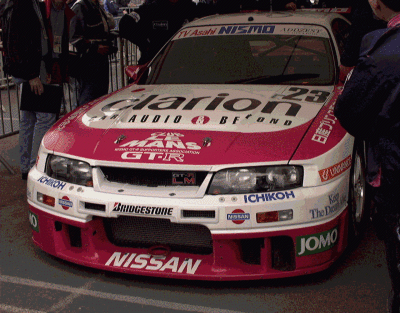
The 1995 Le Mans car was prepared by Nissan's own motorsport Division NISMO, after running as high as fifth the car retired due to transmission failure. Its blue and white sister car, No.22 finished in 10th place (5th in GT1 class), driven by Fukuyama,Kondo & Kasuya. The car had a 2.5 litre in-line six-cylinder engine producing almost 560bhp, driving the rear wheels through a x-trac six speed sequential gearbox.
Even with all this power and technology, the Skyline was no competition to the all dominating Mclarens that swept the board that year. However, unperturbed Nissan and NISMO returned to Le Sarthe the following year with two even more powerful cars (2.8 litre - 600bhp), however time had moved on and the multimillion-pound Porsche 911 GT1s dominated the category. The only bright note of the 1996 race, being that only the all Japanese car of
Hasemi, Hasemi & Suzuki finished that year in 15th overall (10th in GT1 class).
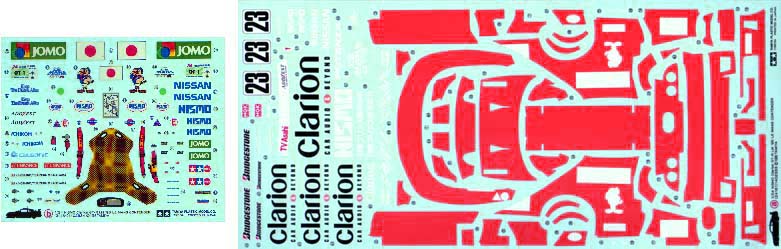
The kit is in the usual Tamiya box with an excellent painting of the car on the cover. Inside contains 4 sprues, one body, (all individually bagged) the usual tire bag and 2 excellent printed decal sheets.(see fig2). The sprue breakdown is as follows;
A - Mechanical components and chassis (silver).
B - Interior components (White).
C - Wheels & lights (Chrome).
D - Clear components.
The instructions are the usual Tamiya booklet split into 11 steps over 10 pages.
Tamiya paint colours are provided.
The construction was quite straightforward so I’ll just concentrate on areas where I deviated from the instructions.

First I prepared the body, using Halfords white primer, followed by Halfords Appliance Gloss White applied using several light coats. This was left to dry for several days and then polished using a LMG polishing kit. I only deviated here by removing the antennae mount and drilling a hole for a new one, this will help with the decal placement later on. I practiced with Humbrol Metalcote paints on the engine bay, as most of this would be covered with the carbon fibre undertray on completion (see fig. 3) it did not matter if I "cocked-up". I used the various shades of aluminium, steel and gunmetal to good effect and I was pleased with the result (shame it all would be hidden).
From reading other reviews in the MRM magazine, I used Vauxhall White Gold on the brake calipers and shock absorbers in place of Tamiya paint mix X11:1+X12:1. For the chassis itself I used Tamiya spray AS-12 Bare metal silver , this is an aircraft colour yet is perfect for bare metal aluminium car bodies.
The outer rims of the wheels were painstakingly masked off using thin strips of Tamiya masking tape and then spayed with white primer followed by Tamiya white TS-26. When the paint was dry I used a sharp scalpel blade to remove the paint from the dozens of small nuts on the wheel to expose the chrome underneath. The tyres were added and decals applied. The wheels are attached using metal pins, however the pins themselves appear to be too long and the wheels were extremely loose and actually came off if they were spun. I filed the pins down and this improved things but they were still too loose. In the end I used a bit of superglue to secure things properly.
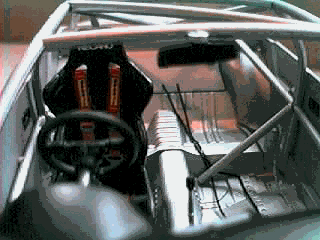
All interior components went on with no problems, I used photo-etched buckles from the MRM set for the seat harness and attached the straps behind the seat on the chassis floor. From looking at photographs of the actual car, it was evident that there was very few cables littering the interior, there are two black cables running from the front passenger footwell to the rear back wall these and braided cable to the rear air-jacks were fitted.(see figs 4 & 5).
The roll cage and side panels were added with no problems.
The chassis was put to one side and work commenced on the body.

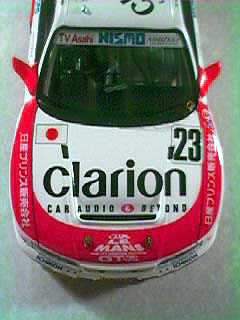
The CLARION "Cherry Red" (Bright pink to you and me) is supplied as a decal, and as I have done much more complicated schemes, like the JACCS Honda Accord I was expecting no problems. How wrong could I be !
I started with the front of the car, which granted, is the most complicated with lots of curves and angles. I was shocked when the decals began to crack and break up !! But this is a TAMIYA kit, Japanese perfection, AARGH !
Adding MICRO-SOL only made things worst and I had to abandon the whole area.
I presumed that I must have a faulty set of decals, so I asked RIKO if they could supply me with a new set. After a week the new set arrived but still with the same problem !
I was about to commit Hari-Kari when I thought to myself "all is not lost, be positive".
I now had to find a matching bright pink to spray the front of the car, after much searching I settled for Halfords "Nitro-Pink" which is a cycle spray paint. Unfortunately it is Matt paint and needs a coating of lacquer when dry. The colour is not perfect but it’s the closest that I could find.
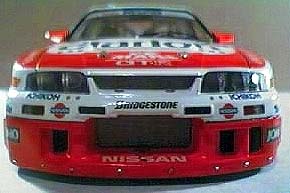
After masking out the upper portion, I sprayed the front section with the Nitro pink and then just applied the side decals Nos. 15 & 16. Which go on with no problem.
It is very important that you add the side air intakes parts B14 & B15 after applying the side decals.
This is because the decals will not cover them without breaking up. I sprayed them with the Nitro Pink then glued them in when the decals were dry.
Finally on this section I drilled out the rivets along the front which were lost under the paint and decal and added my own after-market ones.
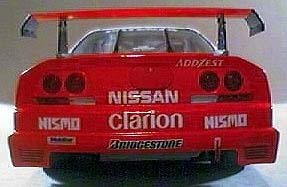
Apply the side decals 4 & 5 first then the boot lid decal 10. I had a lot of problem with the sidepieces, the secret is to leave them until they are almost dry before applying any MICRO-SOL.
Start at the top of the boot and work your way down with a lot of patience and you shouldn’t have too many problems. Nos 64 & 65 that cover the rear grills broke up so I applied some paint and a black wash to improve their look.
My first attempt to decal the rear spoiler failed miserably with it refusing to wrap around without breaking up. So I spayed the underside with the Nitro Pink, cut the middle section from decal no.11 and applied this to the top. The sides of the undersides were decalled with carbon fibre decal. The sidepieces were applied with no major problem.
Carbon fibre was also applied to the rear spoiler support struts.
After leaving the decals to dry, I found another problem, the white decals are too opaque and those on the pink sections began to turn a light pink. As mentioned above I fortunately had a spare set of decals and therefore I re-applied all white decals on the pink areas.
All other decals where applied with no problems but take your time !
Other modifications included Photo-etched bonnet and boot pins, photo-etched wiper blade, bare metal foil for the exhaust heat deflector and a scratch built aerial. From the spares box I added a mesh debris guard in front of the radiator and on the cooling intakes for the rear brakes, these are very prominent on all GT cars and the cars looks odd without them. The kits tow hooks where replaced with more in-scale photo-etched ones.
And finally added mesh grill to the large air scoop on the bonnet.
The finished kit is very impressive, however the enjoyment in making it is reduced due to the poor decals. If I did the kit again I would of sprayed all the pink areas and cut out the white masks from the decals.
I would also recommend obtaining a second set of set of decals so that the white sponsor can applied twice.
Due to the complexity of the decals I can only recommend the kit to more experienced (and patient ) modellers.
Nissan Le Mans 1995 web site : http://www.nissan.co.jp/Lemans/Library/
(loads of brilliant crystal clear pictures.)
The GT International – The cars 1993-1998 by Mark Cole. (Excellent reference book)
 |
|
 |
 |