1/24 Lotus Cortina
by William de Pooter
Up to, say fifteen years ago, it was easy for a "1/24th scale sportscars" modeler to determine the range of eligible subjects. One could easily build "all" the kits made available by the plastic model manufacturers, and more than once, too. The emergence, indeed the actual blossoming of the "garage" resin model makers has thoroughly changed that. I for one am not complaining about it!
But it does mean that I have to make choices now, partly for financial reasons, but most of all because of building capacity/time reasons. Being a Belgian, I have made the "natural" choice of limiting myself to building models of cars that have been either raced by Belgians, or been entered in a Belgian event and/or by a Belgian team, or have been manufactured by a belgian constructor (not many of those around, however ).
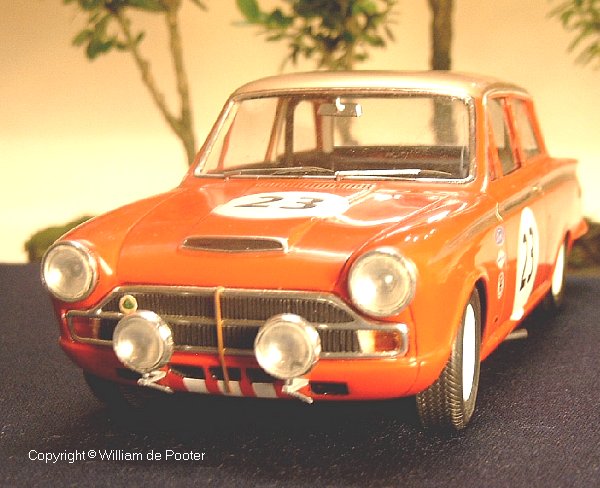
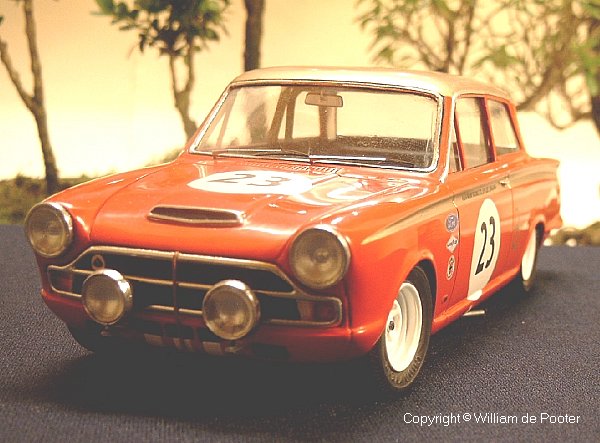
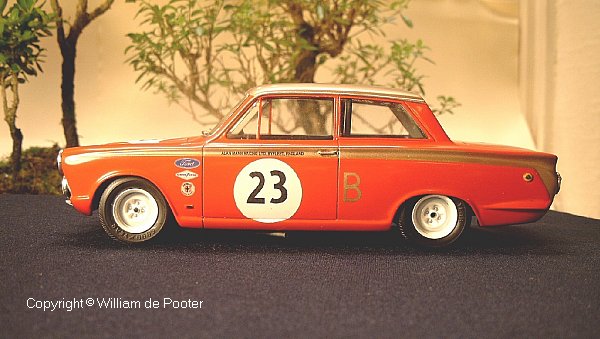
Which left me with a very thin choice for this Trans-Am contest. The only Belgian driver I could find was young Jacky Ickx, in an Alan Mann Team Ford Lotus Cortina. Fortunately, Scalekraft of South Africa makes a trans-kit of this car. Unfortunately, the one I had available (bought a long time ago in Germany), was the earlier slotcar version, without the photo-etch, tires, door panels, headlight glass, etc., that now come with the "full" version.
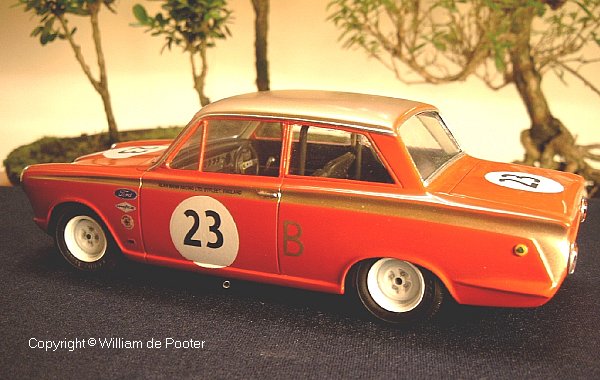
Since I had decided not to do the bottom, I started with the body. I felt that the shape of the roof was a tad too bulbous, so I sanded it somewhat flatter. Also, the base of the rear window looked suspect (bending slightly downwards in the middle), so I sanded that off as well, and made a new base with some plastic strip (bending slightly upwards in the middle) and superglued it in place. My third modification was to widen the front window a bit, also by sanding the side frame and a bit of the pillars off and making new ones with plastic strip, again superglued to the body.
I did need some putty for the corners, and I sanded off the vents on the rear window pillars as well, because they were the wrong shape for a 1966 car. I also made two square holes for brake cooling below the radiator grille. Difficult, this, because the resin is almost 1 cm thick in that particular spot. I also had to alter the shape of the radiator opening up front, since I was going to do the wide "post 1965" grille, with integrated turn indicators. I also "extended" the molded-in side profile a bit more to the front, with jeweller's files and other abrasive gear. And then I started thinning down the insides of the window posts/pillars, because they were way too thick on my resin copy, and because I needed some recess on the inside to install my "glass". And inevitably broke a couple of them (resin tends to get really brittle at 1 - 2 mm thickness ). So in came the strips again, for replacements where needed.
After having washed the body with some diswashing detergent and an old toothbrush (and having broken another post/pillar in the process, and having mended that, and washed the body again), I let it dry and then sprayed it with some primer for plastics, since enamel does not stick much to bare resin. And then it was body painting time. One helpful GPMA member gave me a sort of formula for the "Ford Monaco Red" I needed (9 parts red, 3 parts orange, 1 part white),in acrylic paint however. So I mixed that, and then tried to match the resulting colour in enamels, only to find out after a while that Testors/Model Master's "Ferrari Red" was/is in fact a very close match to my mixture. Problem solved. Sprayed on a light coat of the stuff, and then a couple more, and set aside to dry.
Next, I tackled the rolling gear. In my transkit were only 4 resin cast "steel" wheels, 2 of which did not have pinholes. I selected the best one and added an outside rim to it with some more plastic strip (most of which was sanded off again on the inside), and then made a circular (to obtain the best balance between resistance to deformation and the quantity of rubber used) mould of it, using some (indecently expensive but excellent quality) RTV rubber, some modelling clay and a 5 cm wide strip of thin styrene sheet. A few sharp taps on the floor helped release possible air bubbles from the master, and it was set aside to cure.
For the tires, after having looked in a number of european sportscar kit-boxes without much success, I finally stumbled over a what I think might be front tire from the "Little Red Wagon" Dodge that I slammed together some decades ago. The inside fitted my wheels, the outside my wheel wells, it had Goodyear written on it (albeit a little too big), and it had an acceptable thread. Out came the modeling clay and styrene again, and then the RTV. As usual for tires, I made an open mould, which allows me by sanding the resulting half tires to obtain exactly the width I want. And it was set aside to cure.
I Then I decided to have a go at the radiator grille, another very prominent feature for this car. Partly using the existing (narrow) grill as a pattern, I cut and sanded a front profile out of some thick plastic card, and then glued plastic strip vertically on that profile with liquid cement, following the contours of my "plan" view. First the lower half, then the top part. I then slid it into the radiator opening and marked where material had to be sanded away to follow the contours of the body. Then I rounded off the plastic strip with sanding paper, after having corrected where necessary with some putty. Following step was to spray the whole thing with gloss black enamel, more sanding and more spraying, until it was absolutely smooth and glossy, because I intended to "Alclad" it. Which I eventually did - but I just didn't feel it was "chromy" enough. So - out came the sticky shiny sheet ! The effort in getting the grille really smooth paid off with the Bare Metal Foil as well, so it certainly was not waisted. I used some Q-tips and some soft cloth to rub it on and got a lovely sixties shine !
So now I had a skeleton of a grille - but nothing inside yet. Another kit box search in some 1/16th models (bought some at a sale many years ago, first time I actually did something with them ) yielded the rather thick clear sprue I was hoping to find. I sanded some 3 cm of it into the shape wanted, sanded two horizontal grooves into it, sanded the edges until they matched the inside of my grille, then polished the whole thing to a gloss again, and then added some scribed vertical lines. After final test fitting, I cut off right and left indicators from my strip of sprue, painted the back orange and white and superglued them in place - I think the polishing prevented any fogging that might easily have occurred otherwise - plain lucky !
Then : the "mesh". As said, it was not included in my version of the kit (and would not have fitted "my" grille anyway). The few pieces of mesh that I had and the ones I could find at my local hobby shop did not come even close to the real thing, so I was going to have to fabricate something myself (for a change ). I wasn't keen on trying to shape some plastic by carving and sanding and testfitting, mainly because I was afraid to damage my so satisfactory chrome doing the latter. So, instead, I put some "fresh food" thin plastic foil over the grille opening, mixed some Milliput Superfine White and ever so gently (so as not to deform the grille !) pressed a bar of that into the grille opening (top part first, this looked the safest to me). All that was needed was a wet finger to make the Milliput take the shape of the grille. And it was set aside to cure. And the day after, it came out easily - lucky again ! So I left it to cure another couple of days, and in the meantime made the lower part of the grille in the same manner. The desired mesh pattern was then scribed /sawn in the fully hardened pieces of Milliput, and the inserts were painted matte black. I'm not completely satisfied with the result - the final scribing/sawing phase needs some more thought, or at least better execution - but it was the best I could do, given the limits in time and available tooling (if I were the happy owner of e.g. a pantograph, or so ).
Between all this fumbling with plastics, I regularly mixed some black artist's pigment into a couple of cl of part A epoxy resin, then added an equal part of B, using a small container with a lid (a film roll container, in this case - digital camera's are completely useless for this application <g>), shook a couple of seconds and poured the black resin in my wheel and tire moulds (and into a few more previously made tire moulds, because I inevitably mix too much resin). The moulds are first coated with a mixture (or rather emulsion) of 98 % of "white spirit" and 2 % vaseline, by the way, acting as mould releasing agent. The particular resin I used can be handled after about half an hour already, which is nice, but is only "pourable" 30 to 40 seconds after mixing - which is not so nice. But it does "take" fine detail quite well. On each half tire I made like this, I flattened the edge somewhat (profile of the original was a bit too "square" to my liking, but I had not been able to properly sand the sort of vinyl it was made of), and then with an old/dull n° 11 blade made evenly (1 mm) spaced cuts around the perimeter (easy, this, when the resin was still a bit soft). On the wheels I did not (have to) intervene at all, except for having to discard the odd one due to poor casting = the occasional pinhole in the wrong place. I could (should) have drilled a hole for valves, but plainly forgot .
By this time, much of the available time had passed - and all I had was a uniform red body shell, a grille and almost enough parts to assemble 2 or 3 wheels. So, back to the body ! I used the trusted polishing set to get rid of the occasional slight orange peel and in the end obtain the right shine (I never "clearcoat" my models). Then I sprayed it again a couple of layers - being very happy to have found a readymade red and thus not having to remix an exact match to the previous batch - , to cover the places where I polished through all of the first red layers. Then (after a few more days of drying) I polished again. And I was ready for the gold. This I did custom mix, having failed to find an aceptable match to the few colour pictures I have of the car. I first masked the whole car except the roof with some plain tape and a lot of household tissue paper, which was relatively easy, and sprayed on a few light coats of my gold, and then a thicker one. And ended up with a lousy patched result, full of dust. Which was however relatively fast drying, allowing me to sand it smooth soon afterwards, and start again, this time with only the light coats. After polishing this (with only the lighter grains), I was more satisfied.
Next : the side striping. Not so easy to mask ! I finally opted for a roll of narrow masking tape from Pactra, that must have been laying around in my drawers for decades …, completed with some Microscale Liquid Mask for the small corners, and covered the rest of the body with tissue paper. Sprayed on just a few light coats, and removed the tape et all, and only had to retouch some red in a couple of places where it had decided to prefer the tape to my Cortina. Easily done with a 00 or 000 brush, straight from the jar.
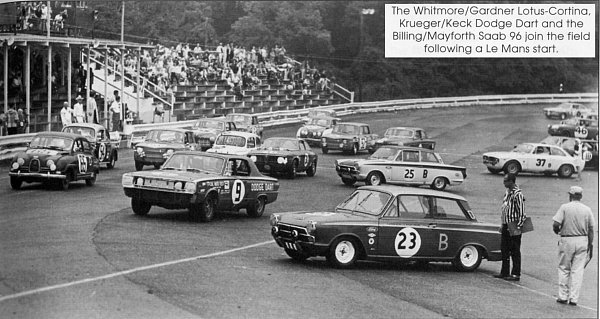
And then I had to decide whether to paint the rear end of the car gold, or not. Most of the Cortina's have a two tone colour scheme, and most of them carry on the roof + side stripe colour onto the rear panel. But : the one and only rear view picture from an Alan Mann Cortina that I have (in a european race, I have to admit), shows a rear end in the same shade of gray (it's a black and white picture ) as the boot and bottom part. The fact that I had run out of my custom gold mixture made the final decision easy . Besides, I can still quite easily change it to gold (albeit of a perhaps slightly different shade), whereas the opposite would be a completely different ballgame !
The wheels, then : again, there was confusion as to their colour (silver or white). The side view from the start of the race points to white wheels, but in the pitstop picture it could be silver (again, both pictures in black and white). Colour photos of later races clearly show silver wheels. Still, I opted for white, again I suppose because my colour pictures John Whitmore's car in european races show white wheels. I touched up the four bolts in silver, the front axle in black (on the rear wheels I bored out the center). All four were sanded down a bit on their backsides. The tires were left their natural coloured resin satin black self, I "only" had to sand 4 half tires to slightly less than the eventual width, and the other 4 halves to just the thickness of the sidewall (dusty business), by moving them in circles on a sheet of coarse sanding paper (on a flat surface). Final sanding with some smaller grain gave perfectly flat mating surfaces, which I then stuck together with some water (yup, water is enough, no need for glue at that stage)to be able to properly align them, and then I applied a tiny drop of thin superglue (from the inside) to permanently immobilize things. It all sounds a bit complicated, probably because it is, but I'm a bit of a tire freak.
Next big step was the inside of the body - since all I had was two front seats, a rear seat in two pieces, and a wrong (because 1963 type) dashboard. But in order to figure out if they fitted, I also had to start doing something about the chassis. The transkit is meant for the Esci Ford Escort Rally, so I saw no obvious reason to look for something else. And to my big surprise (I had been led to believe differently ), it fitted into the body with only minor surgery (but it was obvious that without modification to the suspensions, the car would have the ride height of a monster truck ). Still, those were worries for a later stage. Seats were my current problem, seats and interior panels, i.e. (none of the latter in the transkit either), and the only thing I could use from the Esci interior panels were the window and door handles. After I had cut them out of the doors, and thinned them down, that is.
Some rather thick plasticard was cut to fit the insides of the resin body, edges were rounded off where necessary, and then I chose a pattern from the 4 or 5 I found in my photo documentation and copied this, partly by scraping lines into the plasticard and partly by gluing thin strips of micro-strip onto the panels. Armrests were custom made with some more plasticard. I left the front seats as they were, but had to seriously increase the heighth of the rear seat back (with plasticard and putty and a lot of sanding and scraping), because it was not high enough for the Cortina body. All the panels, and the seats, were then painted satin black, and the chrome bits were covered with Bare Metal Foil.
The dasboard I had in the kit was for the 1963 car, and totally different from a 1965/1966. Starting with the Escort dashboard, I made a new one by almost completely sanding away the front piece and replacing it with a flat sheet of plasticard, into which I had first drilled the openings for instruments and switches, which I had then painted silver and backed with a sheet of clear plastic. Due to the amount of time left, I did not bother to put instrument faces - they would be neigh invisible anyway (and I guess I should not have admitted this <g>). The steering wheel was borrowed from a Gunze Lotus Elan - too small, I know, but the quickest solution at the time. Some scratchbuilt toggle switches were added, and it was time for something else.
By then the body had sufficiently dried to be handled again, and I could tackle the windows. I first BareMetalFoiled the front and read window surrounds, and let some thin black paint flow into the grooves. For the "glass", I made templates in paper to determine the shape and test fit and when I was happy with each "window", I copied them on some clear plastic material from different sources and installed them from the inside, gluing them first with Bare Metal Foil adhesive and then with superglue. The time remaining before the contest "deadline" did not allow many trials, so I did not do the best of jobs here. Looking at it from some angles, it is acceptable however Happy or not, I had to go on. I installed the inside panels and the dashboard into the body, glued the seats to the chassis, and added a rollbar that I made with some Mr. Craft "bendable" plastic rod, cut two holes in the chassis and slipped the rollbar in from the top, adjusted the heighth with the body on the chassis, and then glued it in place. I also found time to cut and shape some pieces of plasticard to serve as inside liners for the window posts (left unpainted). And to scrathbuild an inside mirror with some more plasticard and a piece of copper wire. And a rear "hat" shelf, as we call it here (had to, there was a half an inch gap behind the rear seat that had to be filled ).
The resin front and rear lights had been BareMetalFoiled between other activities, and the donor Esci Escort produced the right "glass" for the headlights. I used Tamiya transparent acrylic paints for the orange and red at the back. The extra driving lights also came from the Escort, I just had to fabricate some mounts with plastic strip into which I drilled some holes (merely to complicate my life, you don't see it in the picture ). Some superglue holds it all together.
Since I was not going to handle the body much more now, I could start thinking about putting chassis and body together, so as to determine what changes had to be made to the (Escort) suspension to make the car "sit" right. There were a few the Escort being a rally car kit, it had the ride heighth of a Citroen 2CV. Nothing that could not be solved by some intensive cutting, grinding and gluing though, and time it was to put on the wheel and tire combo's.
Final step here was to move the car over some sanding paper to flatten the tires somewhat. Which was slightly tricky because I had chosen not to glue the front wheels permanently, i.e. to keep them "poseable".
With the deadline really close now, I made roundels out of plain white decal sheet with a pair of compasses in which I had replaced the pencil by a n° 11 blade (you just need to touch up the hole in the middle with some gloss white after applying them). Since I had been unable to find Decadry or similar numbers in the shape and size needed, I looked at the available shapes on my computer and found that the 2 in Arial Narrow and the 3 in Trebuchet were close. Some trial and a lot of error later, I could put the clear decalpaper I had bought in the meantime, and the recently acquired printer in the office, to good use. The small "Alan Mann Racing " lettering on the doors was done the same way. The white stripes on the car's "chin" were also made out of plain decal sheet.
But then there were the sponsor logo's and the tiny Lotus and Ford badges. And preciously little time ! 1 cry for help to an old modelling fox was enough however to get an envelope with all the logo's needed in all the sizes needed - a mere three days later. For the front badge, I just left the decal on the backing paper and glued it on the grille.
Since by now there was only just enough time to make an exhaust pipe with some aluminium tubing, I did just that, and then put the model in a box, took my model over to my girlfriend's who had borrowed a digital camera from a friend, borrowed some of her Bonsai's and some black tissue and could start taking pictures. Due to my excellent skills in this respect, I only had to do 35 or so to come up with 3 or 4 useful ones. Which were then transferred from my girlfriend's laptop onto a couple of 1.4 Mb diskettes, back to my own computer and mailed to Kevin. Within the deadline ! (except that a few things are missing, like the sanded-off vents on the rear window pillars that I did not - yet - replace, lap- and shoulder belts that they apparently already used, interior sun visors, a gas cap somewhere - still not sure if in this particular race it would have been on top of the boot near the rear window, or on the rear panel as originally -, to name but a few)