For 1995 rules for "F2" (2 litre atmospheric, 2 wheel
drive) rally cars were changed to allow much wilder machines
using special parts that also had to be sold as a kit to customers.
At last we got some interesting creations after all the boring
years since Gr.B was cancelled! Renault took their Clio Williams
Gr.A and created the Maxi Clio. It was used as the works car
only in 1995. Since I like tarmac rally's by far the best, and
especially Tour du Corse, the choice of event was easy. Almost
as easy was the choice of driver pairing. Ragnotti/Thimonier
has been Renault works drivers for many years, and Ragnotti has
a great record both in rallying and racing from early 70's until
today!
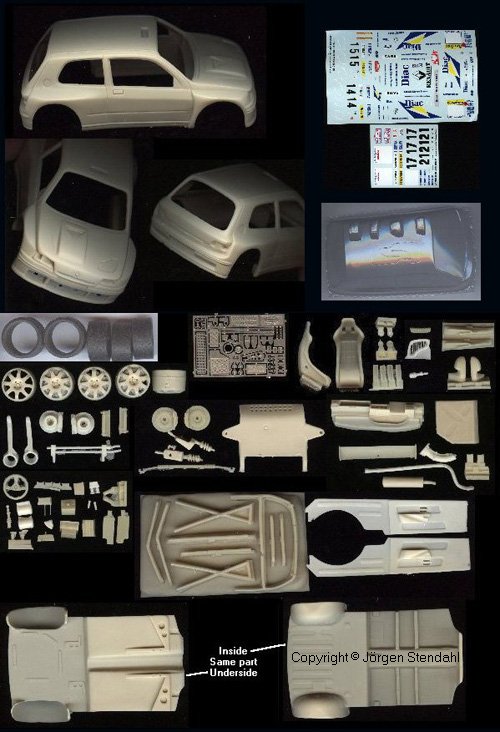
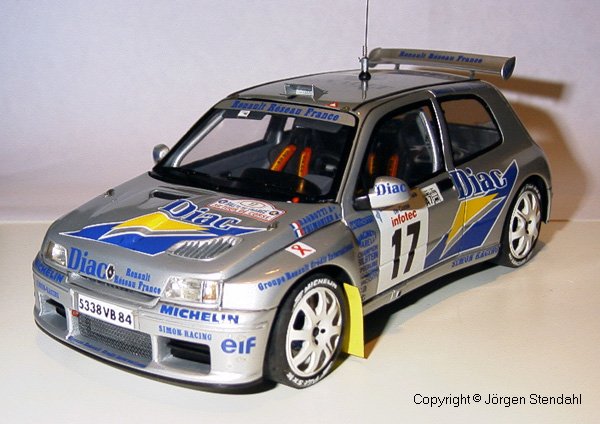
The model is built from a resin kit made by the small French maker Au 43 Parallele. The kit is curbside with quite good chassis detail and a fully detailed interior. The kit comes with decals for both Monte Carlo and Corsica events with Ragnotti and Bugalski options. I think this kit is a good effort, especially considering the limited subject. Nevertheless I had to modify a number of areas... It is important to keep in mind that it is quite easy to be the modeller who starts with an already existing kit and find a lot of details that aren't perfect and need to be improved, rather than creating the whole thing from scratch, which is what the original master creator for a resin kit has to do...
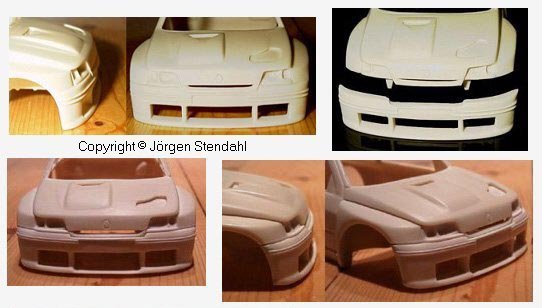
The body looked a bit strange up front, the front bumper seemed to be "tucked in" under the bonnet. None of my reference pictures looked like this. I removed the front bumper from the body casting, which wasn't too easy. The thin lines under the headlights were rebuilt, and the front piece was slightly bent under gentle heat to give it a more curved shape when viewed from above. The radiator opening was deepened and the area around the license plate recess improved. The two lines on each side of the license plate were too far apart, so I removed them and reshaped the top of the bumper. The front was then glued back in its new position. Some filler was necessary at each wheel opening and new horizontal lines were cut from Evergreen styrene strips. The area where the front wings meet the sills also needed filler.
I removed the two moulded in lines on the roof, they are black mouldings, and made new from Evergreen styrene strips to be fitted after the body was painted. The hole for roof vent was slightly altered as I used a photo etched hatch and frame from Meri instead of the kit part. All panel lines were rescribed and deepened, they were quite vague and some were actually completely missing. The two horizontal lines on the rear bumper were replaced the same way as up front. The sill mounted jack points were not provided for in the kit so I scratch built them from thin aluminium. The door handles were also quite vague, so I removed them, improved their recesses and made new from plasticard.
As I started to cut the vac formed windows it was apparent they were slightly small. I also wanted to make the windscreen posts on the body a bit thinner, so I would need an even larger windscreen anyway. The windscreen posts were fixed and new windscreen was cut from thin acetate. This worked well as it is quite flat. With that done and the vac form discarded it was just as good to make sure all the other windows would have a correct shape as well. I had to make small adjustments to both the rear side windows and the rear window, and then all were cut from sheet acetate.
The main chassis part required a lot of adjustments to obtain
a proper fit, mainly as it wanted to sit too far back in the
body. I had to add material at the rear and adjust the front
to fix it. The interior sides also took some time to fit well.
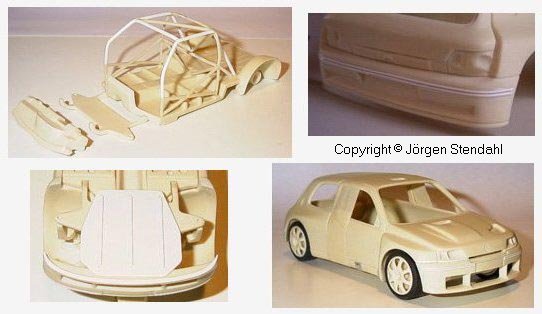
Some parts of the roll cage was omitted in the kit, but I prepared
the parts that were included to start with something. I filled
in the missing parts with Evergreen styrene rods, and also replaced
some of the kit parts as I choose to run the cage all the way
through the dash panel as on the real car, to
allow for a more rigid construction. The rest of the interior
part fitted well and was quite quickly cleaned up.
Time to look at the chassis and suspension. Each wheel took almost one hour each to clean up... It was quickly evident that the rear suspension gave a set-up with far too wide rear track. This was easiest to reduce by modifying the suspension arms at their location point against the torsion bars. I also had to make bushings to put in axle holes of the rear brakes to make the wheels fit properly. With some careful measuring the rear suspension could now be fitted with the rear wheels perfectly located under the wings.
The front suspension also required modifications. The main front suspension part which included the front of the framework, simplified suspension arms and the skid plate was adjusted where it met the main chassis so that the uprights ended up in a position giving correct location of the front wheels. The uprights then had to be bent under heat to correct the camber angle. The front track was now correct with the brakes fitted. The kit skid plate was bend upwards in the front, covering almost all of the lower air intake. I cut down this part and made a new skid plate from scratch.
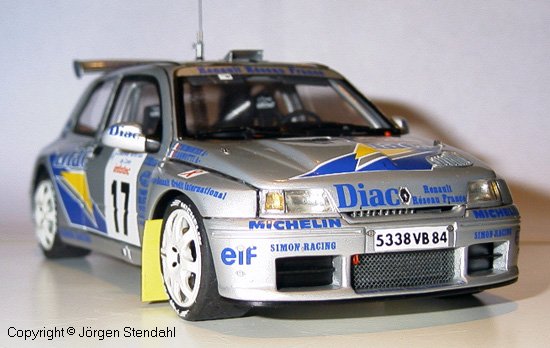
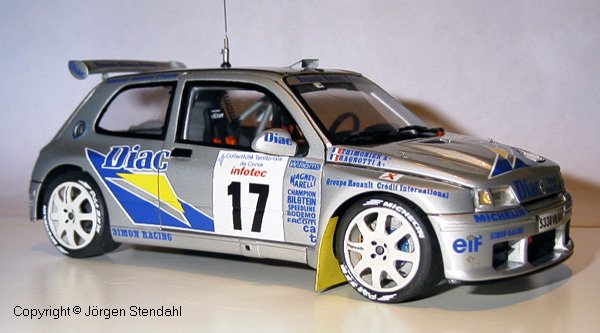
The body and other silver coloured parts were painted with automotive paint, Dupont Centari base coat paint and ICI 2-part clear. The wheels were sprayed white using Glasurit 2-part paint. The decals were applied with no special problems. Virage decals are usually very good, but these were thinner than usual and required care, but worked out fine.
I changed the kits photo etched mesh for the radiator air intake to one I made from a tea filter, and made a radiator part to fit inside, and also the "snake" shaped cooling line that is just visible inside the air intake under the bonnet. Hood pins from Modeler's and dzuz fasteners from Detail Master were used. The kits photo etched tow hooks were too large, so I changed them to 1:43 hooks from Tameo, which are also a bit large and therefore perfect in 1:24 scale! The seat belts are a set from Meri and some small parts from the kit. I wanted to include the wires for the intercom equipment that comes down from the roof as they are very visible. They were made from a thin spring that could be pulled out and painted.

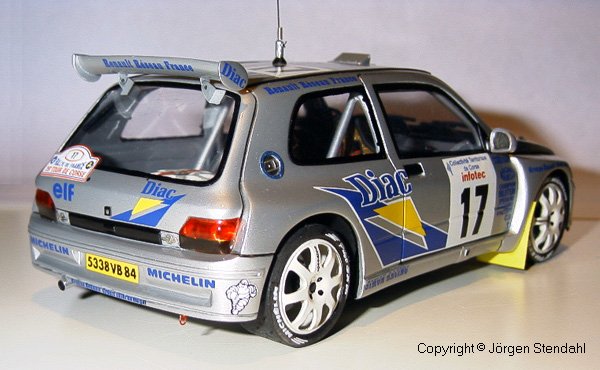
It's a pity that the two rear emblems were decals and not photo etched, as they don't look right against a silver metallic paint work. I wanted to use the rally plate decals from Colorado, I think they are better, but their 1995 plates are not entirely correct, so I used parts of the kit decals to fix this. The plate for the rear end was applied on very thin acetate sheet and then cut out, on the real car it is a plastic sheet and not a thin vinyl decal. This allowed me to mount it across the rear window edge with a correct look. Bare Metal foil was used as head light reflectors and on the bonnet emblem.
The extra time spent earlier to ensure the body and chassis would fit with the wheels sitting correctly paid off when the main assemblies were put together. After that it was just a question of fitting the windows and the last details. Ragnotti's car didn't have the interior rear view mirror according to my pictures, so that was left out. Two window clips were present at the windscreen top, but nothing was included in the kits photo etchings, however my own photo etch scrap box contained perfect parts. At last a little time was spent on the antenna detailing it with a real spring mount and a correctly sized photo etched wing nut.
How empty wouldn't the model world be without resin kits . . .
Jörgen Stendahl
Our digital den: http://www.users.wineasy.se/stendahl/mod