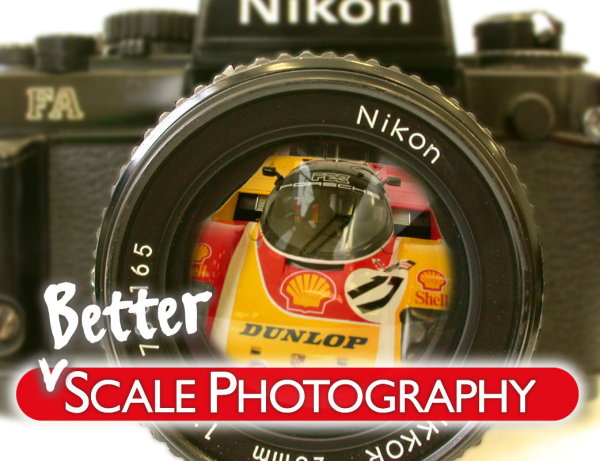
Better Scale Photography
by Anthony Calderisi
It was inevitable that two of my life long hobbies would intertwine before long. As a youngster I decided to take pictures of my latest model in the hopes of fooling people into thinking these were real cars. The slide projector screen was not so forgiving, however, and it was obvious they were miniatures.
Exactly what sets apart some miniature photography from others so that we're sometimes unsure of whether we¹re observing a scale model or the real thing? No matter what the scale, build quality and attention to detail are without a doubt number one. We'll be ignoring those aspects though, since GPMA members seem to be doing fine in that department. Instead we'll outline decisions made behind the camera that could vastly improve anyone's scale model photos.
Equipment needed
The ideas herein are for people who already have a camera and would like better results with what they have without the expense of having to buy more equipment. What you¹ll need is a 35mm or digital camera with manual functions and a tripod. White card stock could be used under and behind the subject and can be used to reflect light in shadow areas. A soft clean brush may be used to wipe off any dust that may have settled on the model. That's about it.
This article is geared toward indoor photography with shorter focal length lenses in an effort to go in as close and as clearly as our equipment will allow. If you have a wide angle or a macro lens you will see how it can be a great advantage over a 50mm or longer lens. If you've got long lenses don't throw them out just yet, or run out to buy a macro or a wide angle. Just remember, these techniques can be used with a greater or lesser degree of success with all lenses.
Why shoot indoors?
Excellent and very realistic results can be achieved shooting outdoors in direct sunlight. Direct sunlight can lend a realistic feel to a model especially in conjunction with dioramas or props for the outdoors or "at the racetrack" look. However, care must be taken so that the model is not in harm's way. A sudden gust of wind can blow away a prop or even a model.
Direct sunlight can be unforgiving when it comes to revealing panels or doors that don¹t line up perfectly, or it can shine through parts which are not opaque. Shooting outdoors is also dependent on the weather, which may limit when you can shoot your subject.
Natural ambient light indoors is perfect for our purpose. The best scenario is to use a sturdy table top with a lot of natural sunlight. Diffused will be easier to handle than direct sunlight. Taking pictures takes time, so make sure to place your setup where your sunlight won't run out on you, or you may find yourself ending your photo session early. We'll also be avoiding the use of flash in order to simplify things and keep expenses down. A large sheet of semi-transparent white paper can be helpful to diffuse direct sunlight over your shooting area. And you can use a white reflective card to fill in dark areas.
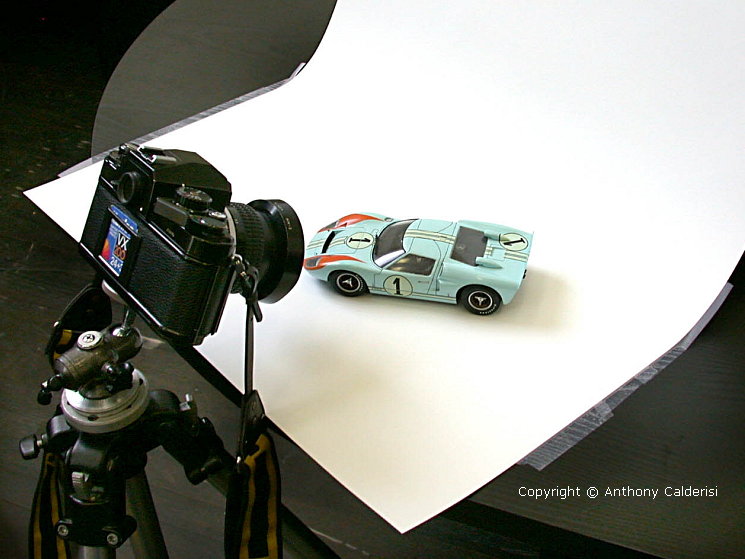
Simple set up: Choose a solid base, and your camera should be on a sturdy tripod. A curved piece of cardboard under the subject provides a seamless background. (Click thumbnail for a larger view)
What about using a lamp to increase light on the subject? Be aware that every artificial light source emits a colour cast on daylight film, from green to orange depending on the type. The cast seems to be augmented with longer shutter speeds which we will be using. Some digital cameras offer white balance correction to compensate for this. See your camera manual for details. The option of correcting color casts in imaging software after the fact is also a possibility.
A way of gaining more light indoors is to use a higher speed film. Moving from 100 ASA to 200 ASA will give you an extra f/stop. The trade off of fast film is increased grain for traditional film or 'noise' with digital ccd's.
Grain will also be more pronounced when a portion of an image was cropped and blown up. Experiment and see what suits you best.
How is a picture made?
Whether traditional film or digital, light entering a light tight box is recorded onto a recording medium. The part that concerns us is the two variables which allow a correct exposure:
The quantity of light being recorded is controlled by the aperture.
The amount of time the light is allowed to affect the medium is controlled by shutter speed.
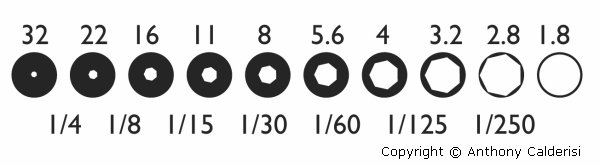
A smaller aperture requires a longer shutter speed. Using a tripod avoids camera shake below 1/60th and blurry pictures. (Click thumbnail for a larger view)
You may think : Who cares whether I shoot the picture at a small aperture for a longer period of time versus a wide aperture for a shorter length of time? Both exposures are good. True, however both pictures yield a different creative result. This is the key in taking better scale pictures, controlling these two variables, light and time, so we can exploit greater depth of field.
Depth of field: The key to sharper pictures
What gives away most model car pictures? By far, lack of depth of field. You've seen it. From the middle of the car's hood to, let's say, the rear wheels, everything is sharp. In front and behind this area is out of focus. However we can increase the depth of field range so that the whole car, or at least more of the whole car, is in focus.
Following are the factors that influence depth of field.
Scale
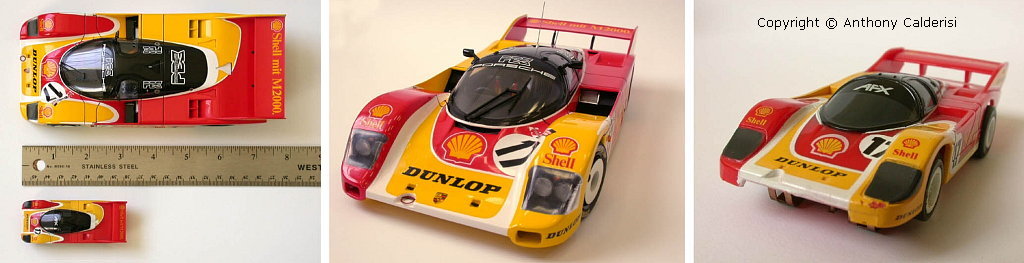
The larger the scale, the easier and the less critical depth of field becomes. Shooting 1:43 is going to be more critical than 1:24. 1:24 more so than 1:16 etc. Depth of field is not a problem when shooting a 1:1 car because we are standing a few feet away. With a 1:24 model the camera is very close to the subject.
Despite the difference in scale, a reasonable amount of sharpness is also present in the smaller scale car on the right. Backing up from the subject using a short focal length lens and the use of a small aperture has made this possible. Which brings us to the next point. (Click thumbnail for a larger view)
Distance to the subject
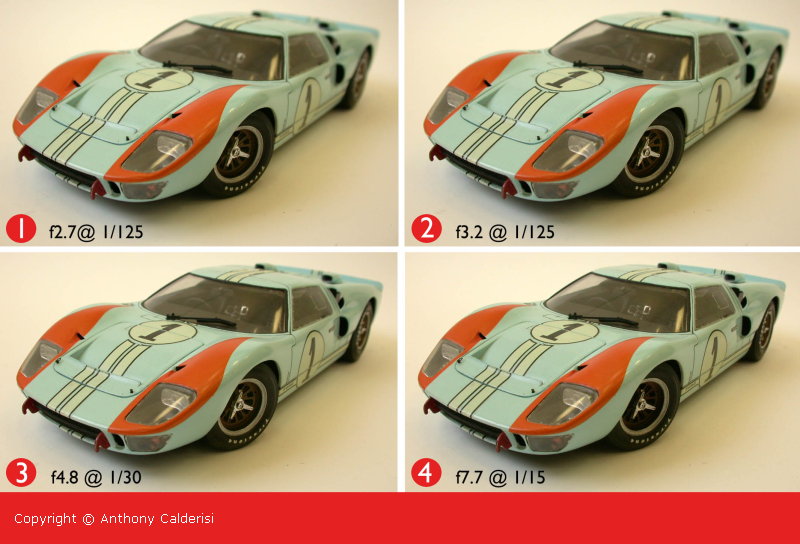
The closer the camera is to the subject, the narrower the depth of field will be. Moving further away from the subject will increase depth of field. Notice how backing up a bit increases depth of field. The same aperture/shutter speed combination was used in all photos.
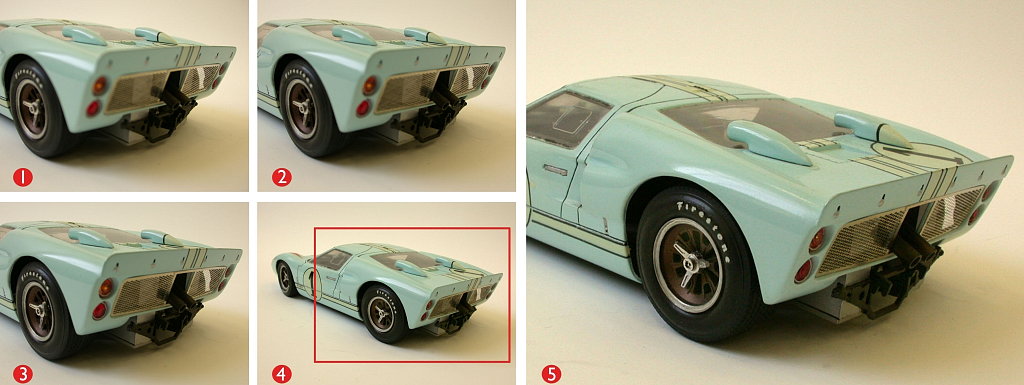
Frame 1: An f/stop of 2.8 has shallow depth of field. Using progressively smaller apertures in frames 2 and 3 there¹s a gradual improvement, but the tail lights are still soft. Backing up from the subject has given us more depth of field although the angle is less dramatic. Cropping the image (frame 5) makes the image appear as though the camera was closer than it really was.
Choice of lens
Lenses with a longer focal length (70mm and up) like telephotos and zooms have little depth of field. A shorter lens (24-35mm) can move in closer, usually with a lesser focusing distance and will give greater depth of field and sharp detail from foreground to background. Because it moves in closer to the subject it distorts the shape and makes the subject appear to recede more sharply. A longer lens tends to compress or flatten out the image.
These images demonstrate the minimum focusing distances of three different focal lengths. Longer lenses have longer distances, make flatter less dramatic images and have less depth of field. (Click thumbnail for a larger view) Notice the different effects different lenses have on the same subject.
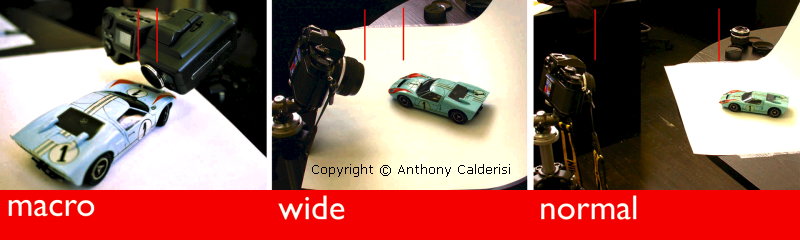
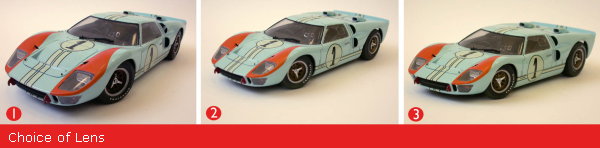
A short focal length (frame 1) of 28mm is dramatic and exaggerates proportions. Often used on car magazine covers. A 50mm lens, often called a normal lens, (frame 2) records a good image without distortion. A long focal length of 150mm as in frame 3 compresses the image making it appear squashed. This is typical of distant on track photos.
With some macro lenses going down to a centimeter in minimum focusing distance, great close ups aren't much of a problem. Back up an extra centimeter or two and further increase depth of field for crisp, clear images. (Click thumbnail for a larger view)

Aperture/shutter speed choices
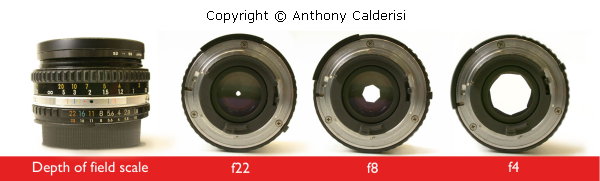
As mentioned earlier, we can choose what mix of aperture and shutter speed we will use to take a given picture. With a smaller aperture we can increase depth of field. But, because it allows less light to reach the film/ccd, the film needs to be exposed longer, thus a slower shutter speed and the need for a tripod. Look at the following set of pictures. Notice how the overall exposure remains constant but how the different shutter speed/aperture mix changes how much of the photo is in focus.
Different aperture settings seen through an unmounted lens.
The focus area is just in front of the windshield. From frames 1 to 4 notice how smaller apertures extend sharpness over the whole car. (Click thumbnail for a larger view)
Depth of field preview
You've got everything set up and are ready to take pictures. How can you see what's in focus before taking the picture? Some cameras have a depth of field preview. This is a great feature found on better 35mm SLRs. When pressed, a lever or button locks down the aperture to the chosen setting enabling you to see in the viewfinder, before taking the picture, exactly what will be in focus. You'll notice that the viewfinder becomes darker, (unless you're at maximum aperture). The change in darkness you see is of no interest.
However, what you do see are portions of the image that become sharper depending on the aperture chosen, the smaller the aperture the sharper the image. This is a great help in determining what aperture to choose and also where to focus on the subject. Digital cameras provide you with an LCD monitor. The better ones have a feature which simulates sharp and soft focus and most have a zoom feature which can be used once the image is recorded to confirm sharpness.
These are just a few basic ideas that are bound to make a difference in your scale model photography. Try them and you're sure to be pleased with the results!