1/12 Maserati Tipo 61 Birdcage
Model, Text, and Photos by Sam Grasso
After a couple of decades, I was lucky enough to run into an old friend at a Porsche swap meet, Dale King. He is still as much of a Porschephile as am I, and a celebrated modeler as well. We spent a few months catching up on our families, cars and of course, modeling projects. I must admit, this gadget called the Internet works quite well for researching such things.
One day, rather than using email, Dale was on the phone. He was overjoyed with his newest acquisition from Hapico, the Make Up Birdcage Maser Tipo 61. It was the most beautiful thing he had ever seen in 1/12 scale resin. Within an hour, he had rekindled, the then dormant, modeler in me and I was on my way to meeting new people and giving them large sums of money. Before then, it had been nearly 20 years since my last serious model.
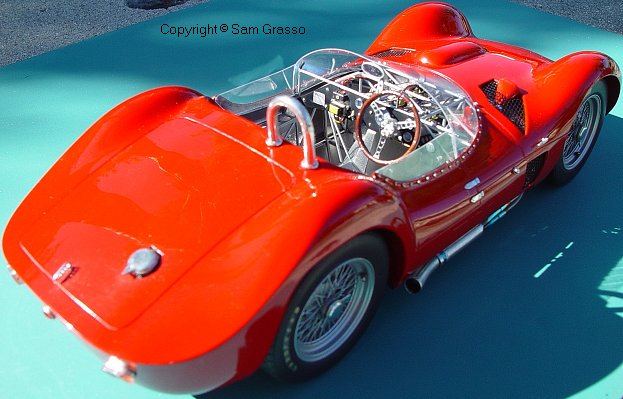
The kit is a beauty. First, there is the body itself, which has captured the lightness of the real car...in spite of the fact that the resin in the shell must weight two pounds! The wheels are stunning in their raw brass. The medal castings are as good as I have ever seen, and the P/E sheets are magnificent. Are you feeling all warm and fuzzy now?
One of the reasons I chose this project was that this "curbside" model would be a painless and undemanding way to ease back into the black art of super detailing, ... at least that's what I told myself then. I had really enjoyed doing it in the past, so how hard could it be? We're only talking about the interior here, right?

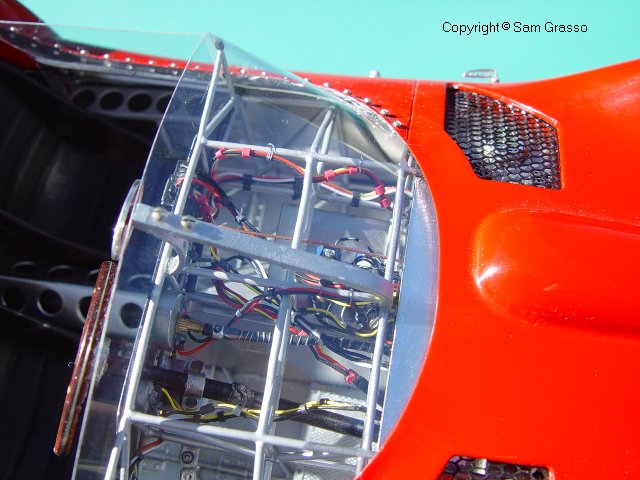
In the first week, while I was still trying to decipher the Japanese instruction-manual, Dale E-mailed me a photograph of a primered body and the completed superstructure that is the pick-up-stick like frame. This is what gives the car its name: The Birdcage. I was dumbstruck! I called, complaining of how the lengths of the brass rods, called out for in the instructions, didn't match what was needed on the model. As if that were not enough, every time I soldered a single joint, I would invariably unsolder another. Dale said he had not run into that problem nor had he read the instructions; he was simply following the drawings!
Here's one tip I would like to impart: Unbeknownst to me was the fact that this particular resin is unaffected by the heat of the soldering iron. Therefore, one has only to use the chassis in the kit as a jig to support the four primary uprights, (holes provided) and continue to build across, ultimately joining the two sides. Once this is done, it is quite easy to follow the pictures, cut the stock to length, and solder your heart out. In fact, it was so much fun that I started to build a fairly comprehensive file of photographic data on the prototype. I started adding more struts here and there and taking those first steps toward achieving a level of detail I enjoy. Be this as it may, my enthusiasm in this endeavor began to fade as the heat around the joints were very close to each other, launching the inventible meltdown.
Again I complained to King, who quickly said, "Well then, why don't you epoxy them in place?" I said, "but, the rest of the joints are soldered and that would defiantly be cheating." Dale laughed, "it's not cheating. It's modeling!"
You need to use a small, round file on the end of every rod to create a pocket for the piece to anchor itself, whether it is soldered or glued. It will be much stronger and look more authentic, rather than just pinching off each piece with your wire cutters.
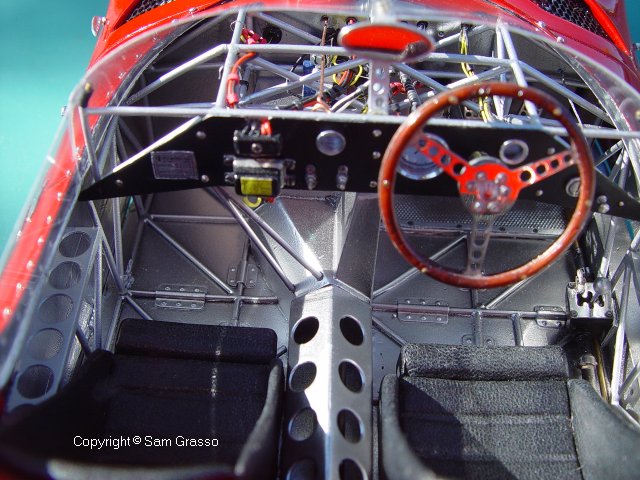
Later on, the steering wheel turned out to be a separate project all together. It faired much better than I had expected. The kit calls for the front and backsides of the wheel, which are molded in white metal, to represent the two wooden halves of the wheel. The P/E steering wheel frame is such a beauty that I thought I would give a try at making the two halves out of real wood.
I have seen a few different methods for doing this over the years and have found, what I think is a fairly simple way. I used a type of wood called "Padouk," which is very red in color, and in my opinion, provides a more vibrant Mahogany-color than real Mahogany does when used in miniatures. The first step is to provide your working stock with a finished side before you do anything else; it is much easier to do this to a block of wood rather than a very fragile ring. Next, on a table-saw rip a very thin piece of wood off the finished edge. My block was about 2"x 6"x 12"; the 2" side was the finished side. The rip-cut I got, after three attempts, was .056" slice. However, it should be said that it is not necessary or safe to make a complete cut, since you only need a very small amount of wood. I cut down about 4or5 inches, stopped the saw, and when the blade stopped, I picked up the block and cut the thin piece off with a hobby knife. Next, cut your thin plank into two pieces large enough to use a divider and swing a circle just a hair larger than the OD of the steering wheel frame. Make another circle, this time a little larger than the inside diameter of the frame. Cut your second ring using the same technique.
The real trick is to now cut these two circles and form matching rings. I too had my doubts, but the following worked so well that I am now sure that someone must have used this technique before. I applied masking tape to the rough side of the piece to reinforce the wood. Then loaded my jewelers saw with the highest tooth (ultra-fine) count blade. Next, I placed the wood, tape-side down, on my wooden V block bench extension (this is that very simple wooden clamp tool that you see in Mirco-Mark catalogs,) and cut the outside diameter first. As long as you support where you are cutting you will be amazed at how well this works. After cutting the outside, drill a small hole for the blade and cut the inside circumference. If you should happen to crack the piece (as I did) stop and repair it with CA glue, making that spot the strongest point on your piece.
Once you have two rings the next task will be to glue the rings to the frame. First, carefully remove the tape from the backside of the rings; a very thin, sharp blade will help. Then glue (I used a contact cement) the ring that is the back half to the back of the frame. Make sure that the ring is centered so that you have a little bit of wood showing beyond the outside and inside of the frame. Place the wheel-frame, frame-side down on a flat surface and place some sort of weight on top of the wood, which should be covered with wax paper. This will insure full contact of the cement all the way around the frame. Next, the frame is drilled with holes to accommodate the brass rod used to simulate the rivets holding the two halves together. Drill out these holes from the frame-side through the wood on the backside. Now glue the front-ring to the frame, using the techniques described above. When all is dry, re- drill the holes starting from the backside through the frame and through the face of the front ring. Take the appropriate sized brass wire, cut into lengths just a little over-sized and glue them in place. You can snip these off after they have dried but don’t try to cut them flush, or else it will leave you with a point rather than a dot. To obtain a nice dot, use an abrasive wheel in your Dramel tool and carefully grind the rod, flush with the wood.
Now for the fun part, Double-nut a machine screw through the center hole of the wheel-frame. Chuck up the machine screw in your lathe. Now, cut the ends of emery boards, to fairly sharp points, and at a very slow speed. Hold your emery board at 90 degrees to the spinning wheel. Remove the material little by little. You will know when you're done with this shape when you reveal a nice sandwich of wood-frame-wood; just like the real deal! I must remind you to turn this at a very slow speed and start working both the front and back of the wheel until you have removed everything that isn’t part of the steering wheel itself. If you are careful, you can work the inside edge of the wooden rings surprisingly close to the frame, without any damage.
Once you are satisfied with the shape: leave it alone and come back later! We've all heard this before, but it really is the best piece of advice for all artists and craftsmen. I say this because, in my opinion, the biggest problem I've noticed with scale wooden wheels is that there is too much wood left on the rim, making it look fat and out of scale. My wheel measured about .100" across the center of the three components. If you have a milling machine, you can set it to index all of the finger notches on the back, and they should come out perfectly. On the other hand, I used a jeweler's round-file and eyeballed it.
I used spar varnish to finish my wheel, but I'm sure you will have your own favorites too. If you don't have a lathe, think about trying this in your Dremel tool. I have used my Dremel as a lathe for years, and when you think about, it does the same job. It may require some claps and a little ingenuity but I bet you can make it work.
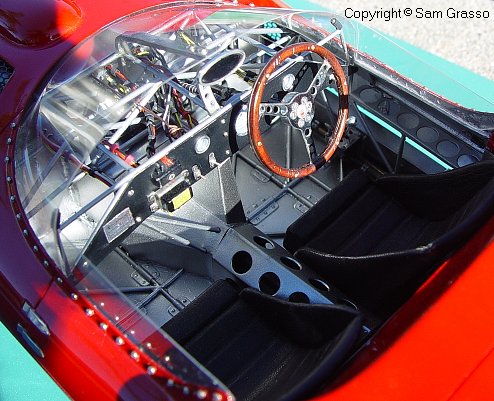
Ninety percent of the detailing in this model was confined to the interior. However, this provided more than enough challenges for one model. Covering seats in real leather that have been skived, is a real challenge and a lot of fun. The sequence of assembling pre-wired and finished instrument panel through the labyrinth of tiny rods that form the Birdcage is quite an undertaking as well. Overall, after nine months of sporadic work, I found that the kit provided a very high-end representation of the historic and legendary Maserati Tipo 61 Birdcage.