Ford Mustang Maxum GTP

Ford Mustang Maxum GTP by William Bauer

What should have been a natural evolution of the Ford Probe GTP, ended up as something that “looked” like a Probe and had a Ford Engine, but that was about the extent of it. Ford was not as interested in GTP by the end of 1986, and Zakspeed was selling their versions to Tom Milner. Jack Roush, with some unfinished business in GTP and being aligned with Ford, approached the Maxum owners with a plan to use a V-8 rather than the Zakspeed turbo 4 in the chassis. With these players in the game, no fewer than 5 “Probish” cars were on the grid for the 24 Hours of Daytona in 1987.

The MAXUM chassis was assembled in England and designed as a customer car. Although it looked similar to a Probe, only the rear uprights were in common. Roush had a contract with Bridgestone tires and the car was designed for Goodyears. After the 24 hours, Roush campaigned the car with Pete Halsmer and Scott Pruett, but never put the development into the chassis. He ultimately lost interest in the project and decided to concetrate on NASCAR. Ford sold everything to Milner and offically withdrew from GTP.

Kit Details

This is the latest QuikSkins offering.  As with the Probe, everything just falls together in this kit. The basic chassis and wheels are the same. Also apparent are the subtle differences. For example, I tried to use some spare window decals from a Probe, and they did NOT fit! It makes a striking model, and it looks great next to the Probe or any IMSA Prototype of the era.

Personally, I like the large airscoop on the back and the detached wing.

Gurney Eagle F1

1/24 Gurney Eagle F1 by Andrew Sapiro

At this year’s Monterey Motorsport Reunion, Dan Gurney’s Spa-winning car was displayed in pristine restored condition. This unique model by Andrew Sapiro is a faithful replica of the original.


Ferrari F60 F1

rwf60-01

1/20 Ferrari F60 F1
by Russell Wells

rwf60-02

This Tamiya Ferrari F60 was built pretty much straight out-of-the-box (OOB). 

rwf60-06 rwf60-07 rwf60-08

I purchased the Zero 2009 Ferrari F1 color from Hiroboy.  The paint arrived in two different bottles.  One bottle was the base silver, and the other was the Red top coat.  When I initially shot the silver base, it was very coarse, and basically was no where near to being scale.  I ended up using TS-30 Silver Leaf as the base, and top coating that with the Zero 2009 Ferrari F1 red. 

rwf60-09 rwf60-10 rwf60-13

The model was typical Tamiya quality as fit goes, but it had no less than 50 or so ejector pin marks all over it.  By the time I finished filling all of the ejector pin marks, the model looked like it had “Chicken Pox”. I did not do a lot of detailing on this build, for the simple reason of lack of reference pictures.  I had planned on really detailing the engine area, but the lack of reference material squashed that idea. 

rwf60-12 rwf60-14 rwf60-11

I replicated the CF with a combination of semi-gloss base, followed by Testors metalizer gunmetal shot through a ST27 Screen, followed by another layer of semi-gloss black shot through the same screen.  I ended up with a very subtle pattern that revealed itself very nicely in a well lit room. 

rwf60-05 rwf60-03 rwf60-04

All in all I was very pleased with the finish.  I over-coated the red with Mr. Super Clear Gloss.  It polished out nicely, and was a breeze to work with. 

Ferrari 330 LM TRI


ds330-01

1/12 Ferrari 330 LM TRI
by David Sorensen
1962 Le Mans Winner
Drivers: Olivier Gendebien and Phil Hill

ds330-05

The chassis and engine did not require extensive modification. 

ds330-02 ds330-03 ds330-04 

The bodywork was another story. The back half of the kit was heavily modified by Motoi at HAPICO.   He said the rear end was all wrong, and he would not let me build the kit until he enlarged the rear vents, the spoiler, rear quarter vents, and the wheel openings.

ds330-06 ds330-07 ds330-08 

He also cut out the rear lid, so I needed to scratch-build a gas tank and find a spare tire. 

ds330-09  ds330-11 ds330-15 

ds330-12 ds330-13 ds330-14

This was a very challenging build.

ds330-016

Porsche 356 Gmund SL

dkgmund01

1/12 Porsche 356 Gmund SL
by Dale King

In 1951 the Porsche factory entered two aluminum bodied 356 Gmund SL 1.1 liter coupes in the 24 hours of Le Mans for the first time. The number 46 car driven by Veuillet/Mouche won its class and came in 20th overall. Uncounted motor sport successes would follow this victory. The name Gmund comes from the town in Austria where these first Porsches were built.

The kit, if you could call it that, was a great disappointment. I had bought the resin 1/12 scale Porsche 917 Pink Pig from the same manufacturer (the company shall remain nameless) some time before (it still isn’t finished), and I was very pleased with the shapes and quality of the castings. The Gmund, however, was obviously done by a completely different pattern and mold maker. Nothing fit or was the right shape. I was stunned. I had bought it from my good friend Motoi (Hapico), and he told me to  “bring it back for a refund.” I would have, but the challenge was just too much to pass up. I knew I had to make it work. After all, this is a very important piece of Porsche history.  

dkgmund03

And so began the long task of turning a pile of resin into something that resembled the real car. I studied the body for about a week or two, decided there wasn’t much I could do with it, and so marched out to my garage, started up the band saw, and chopped it up. I ended up throwing most of the pieces away and what I did save was reshaped and heavily modified using Renshape, aluminum and bondo. New bumpers, new roof, new nose & tail, new front & rear ‘skirts’, new windows, new … well, just about everything. Someone said “wouldn’t it have been easier to start out with a block of Renshape?” and of course, in hindsight, the answer is “yes”.

I gathered all kinds of reference photos, even some I had shot myself, and dove into it. Over the next couple of years I cut, glued, shaped, sanded, primered, added and subtracted until I had something that better resembled a 1/12 scale Gmund coupe. The interior also had to be reworked quite a bit. I reshaped much of the basic insides then covered the floor, etc. with 3/4 ounce fiberglass cloth super glued into place to give the appearance of the burlap like material used on the early Porsches. The front seats were reshaped and painted the proper French blue while the upright portion of the rear jump seat was painted a reddish brown.  The rest of the interior, except the dash which is silver, was painted a grayish tan.

dkgmund07

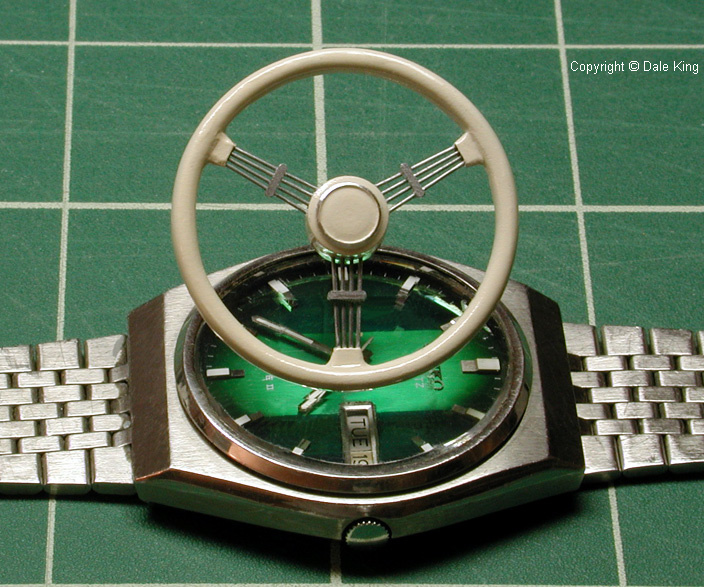
The dashboard, steering wheel and interior door panels & handles were then scratch built as the kit parts, where they existed, were useless. The ‘banjo’ steering wheel turned out to be quite a challenge, but I think the end results are acceptable. All of the exterior pieces (head and tail lights, front road lights, door handles, gas cap, number & license plate lights, front & rear grills, rear deck hinges & latch, etc. etc.) were scratch built in aluminum and clear Lucite. Only the p/e kit windshield wipers were used.

dkgmund06

For the louvers on the rear quarter windows, I first cut sheet aluminum to fit the opening, and then cut and shaped the ends of quarter round Evergreen strip styrene and glued them in place. The rims were the best part of the kit, but of course you can’t see them. The tires were too large, and in order to get them to fit, I had to cut away most of the tops to get them under the bodywork.

dkgmund04

After many coats of SEM high build primer, sanding between each layer, the body was ready for the final, much finer Tamiya primer.

dkgmund05

I then shot  two and a half cans of Tamiya mica silver (TS-76), and after that had cured for two weeks, two cans of Tamiya clear (TS-13). The clear was allowed to cure for a month and then I polished it out with the three Tamiya polishes.

dkgmund02

As with most of the kit, the decals were unusable. I created new art for the numbers, dash board instruments and license plate in Illustrator on my computer and then printed them out on clear decal paper. I shot 4 or 5 very light coats of Krylon Crystal Clear over them and once dry I carefully cut them out and then reshot another light coat of clear. The reason for the last coat is to seal the cut edges so the water won’t seep in and cause the decals to smudge. The roundels were hand cut from sheets of MicroScale white decal paper. Although there are things here and there I’d like to change, I think the overall model came out quite nicely.

1/12 Interscope Porsche 935

dkinterscope01

1/12 Interscope Porsche 935
by Dale King

I recently finished this 12th scale model of the Interscope 935 . The base kit is, of course, by Tamiya.

dkinterscope02

Instead of scratch building the front clip, front fenders and running boards like the Hawaiian Tropic car, I used the resin pieces from Matt Burnett of “Monkey Claw”. It speeded the process up considerably. I did, however, create a new double rear wing and several other small bits and pieces.

dkinterscope03

The 3 dimensional doggie dishes came from California Model Works and will be used on his up coming 12th scale 935 K3 resin kit. The decals were drawn up by Wim Van Viasselaer of Belgium and printed up in the US by Norm at F-1 Specialties. The paint is Tamiya gloss black shot right out of the can then later rubbed out.

dkinterscope04

Hawaiian Tropic Porsche 935

dk935-15

1/12 Hawaiian Tropic Porsche 935
by Dale King
  

In the 1979 Le Mans 24 Hour race, the IMSA class Hawaiian Tropic 935 finished second overall, and first in its class. This was quite an upset. And even more amazingly, the winner was the Group 5 Numero Reserve Porsche 935 K3.

The faster Group 6 cars did not fare well that year.  They proved to be less reliable in the race than the Gr. 5 or IMSA 935s. But thanks to the many privateer Porsche entries, it was another winning year for Porsche at Le Mans, with Porsche taking 1st through 4th overall positions.

The Hawaiian Tropic 935, driven by the unique team of car owner Dick Barbour, Paul Newman, and Rolf Stommelen, became an important piece of Porsche and Le Mans history.

This model is based on the 1/12 Tamiya Porsche 935. Following are just a few of the changes made to reflect this race version.       

Rectangular to Round Headlights

dk935-01

I cut square blocks of Renshape, drilled out the center and then glued them into place.  The spaces
around the block were filled with bondo then the whole thing shaped to match the front curve.

dk935-03 dk935-04

I then machined Lucite cylinders, shaped and polished with the front to match the curve of the front clip. I covered the back of the cylinder with Bare Metal foil and painted the sides flat black.

dk935-051

Here it is installed in the primered body.

dk935-02

I also filled in the louvers on top of the front fenders. I glued a sheet of styrene underneath and then used bondo to fill the holes.

Doggie Dishes (Wheel Covers)

dk935-06 

This shows the changes made to the front doggie dishes. The valve stem opening had to be filled in and the rivets were removed so the decals would lay down properly.

dk935-07

I created the decals in Illustrator on my Mac, and then printed them up on a Canon inkjet printer. The rears, which are quite a bit larger and required different artwork, didn’t need the valve stem opening filled. But everything else was the same.

Rear Wing

dk935-08

I changed the rear wing from a single to a double element type. I cut the kit wing into two pieces and then added half round styrene strips to the leading edge of the rear wing and trailing edge of the large front wing. The three ‘hinges’ were made from styrene. I also filled in the seam between the lower and upper portions of the rear deck.

dk935-09

The rear of the interior required the addition of the cover box for the new intercooler for the twin turbo set up. The side ‘hoses’ were carved from Renshape and wrapped with copper wire. They look a bit crude but then the real ones were too plus the fact that they barely show when the model is buttoned up.

Sills/Running Boards

dk935-10 dk935-11
For the running boards I again used Renshape and some styrene. The radiator opening was
narrowed and I built a new interior with Renshape and styrene. The pale blue is filler.

Twin Turbo Setup

dk935-12

Although this picture is from my 935 K3, it’s nearly identical to the one I built for the more standard 935. The entire exhaust/turbo system is scratch built using resin, aluminum and brass. As the model is a curbside, I didn’t bother creating a completely new and different top to the engine.


dk935-16

Nissan R91VP JSPC

1/24 Nissan R91VP JSPC 1991
by Hossain Salimi

Hossain Salimi, a past GPMA award winner, showed his immaculate Nissan R91VP prototype at NNL West.
The kit is the Tamiya Nissan R89C upgraded with Studio 27 decals.

100_5087b-lg100_5087a-lg

The chassis, engine, and interior are painted with a variety of Testors enamels and lacquers, while Tamiya lacquers are used for the bodywork.

100_5087-lg100_5086-lg

Engine and interior details were added, including carbon fiber decals.

To see more of Hossain’s models from this year’s NNL West, go to the GPMA Gallery.

Jagermeister Porsche 935

dkjager935-01

1/12 Porsche 935 K3 Jagermeister
by Dale King

This 12th scale version of the Jagermeister 935 K3 is as it raced at Zolder in 1981.  The various Kremer K3s were very successful, even winning Le Mans outright in 1979. I based this model on the Tamiya 1/12th Porsche 935 (kit no. 12038).

dkjager935-04

As I wanted the model to be displayed closed up I built it as a curbside .
It was difficult enough to create the exhaust and twin turbo set up but I really didn’t want to spend many additional hours building the new injection/intercooler system that sits on top of the engine as well.
I have too many 12th scale projects underway to make each one a full detailed model.

dkjager935-08

dkjager935-05

The interior has been heavily reworked as well, especially the area behind the driver.  The work was done with resin, aluminum, brass, styrene, Lucite, Renshape and bondo over about a 4 year period.  (as it is all the work on the interior really doesn’t show)

dkjager935-07

The front headlight covers were created by pulling heated clear sheet vinyl over bondo patterns. The headlight buckets were filled with bondo, the outside sanded down to the correct shape and then popped out. Then they were primered and polished before pulling the plastic over them. To finish them I carefully cut and sanded the edges until a near perfect shape was reached.

dkjager935-06

The paint is a custom mix by MCW (Fruehauf orange to be exact). After MANY coats of primer (sanded down between each coat) I painted the body with Tamiya orange as a base. I then shot on the MCW paint and after that Tamiya clear. I normally don’t clear coat but this time it seemed like a good idea.

dkjager935-02

 The paint was allowed to cure for several weeks and then I rubbed it out with a series of Tamiya polishes. The decals are a combination of ones taken from the Tamiya 934, the CMW 956 and custom ones done in Illustrator on my Mac and printed up on special decal paper with my Canon ink jet. My own decals were gently clear coated with Krylon Crystal Clear, cut out close to the edges and then applied.

dkjager935-03

This beautiful 1/12th Tamiya model of the factory Porsche 935 was built by Pete Johnson using the Scale Motor Sport super detail transkit. It helps demonstrate the changes that were made on the Jagermeister K3.

dkjager935-09

dkjager935-10